create retail store in Microsoft Dynamics AX 2012
1- Go to Retail > Common > Organization
2- Click the Organization Hierarchy tab button to create a new organization hierarchy.
3- When the new window opens, click New and assign a name to the new organization hierarchy (i.e. Retail Store).

4- Then click the Assign Purpose button to open the Organization hierarchy purposes window. In here we need to link the Organization Hierarchy you just created in step 3 with the organizational chart portion of AX. To accomplish this, click the Add button to add a newAssigned Category. Once you have created the assigned category, click the Set as Defaultbutton. This will set your configuration as the default one to carry on later on the process.

5- When step 4 has been completed, click the Retail Assortment menu on the left and follow the same process you executed in step 4.

6- When finished you should see the following

7- Then go to Organization Hierarchy and click the Organization Hierarchy view. When the Hierarchy Designer opens, click the Edit button.

8- Click the Insert button and choose Legal Entity

9- The legal Entity (i.e. CEU) will appear in the Retail Store designer.

10- Click as Save as Draft. On the Save Changes windows choose “Save as draft” and click OK.

11- Then you to Retail > Common > Retail Channels > Retail Stores

12- Click New Retail Store and fill the required fields.

13- Go to the miscellaneous fast tab and make sure you have your payment methods. On this, for some reason in my environment, the Credit Card Payment method needed to be setup to 2 and not 02.

14- If all goes OK, you should see the following.

15- Now, go back to Hierarchies to add your new Retail Store to it under your organization. For this, click the Edit button and choose “Keep working on this draft” and click OK.

16- Click the Insert button and choose Retail Channel.

17- From the Retail Channel window choose your new retail store, and click OK.

18- If all is ok, you should see something similar to the picture below.

19- Save your new model as draft again.

20- In order to make the model “official” within AX, we need to publish it. Do this by clickingPublish and Close the Viewer.

21- Select the effective date when you want this model to be active and click the Publishbutton.

22- You should see the following message.

Once you have created your retail store(s), then you can create assortments and assign them to products and/or product groups to be publish into the retail channels. The assortment(s) will then be transferred to the AXRetailPOS database through an N-JOB.
We’re going to create the Call center Retail Channel first, but there are some mandatory fields to set on the Call center, so we’ll need to create the data for that.
1- Go to Retail > Common > Organization
2- Click the Organization Hierarchy tab button to create a new organization hierarchy.
3- When the new window opens, click New and assign a name to the new organization hierarchy (i.e. Retail Store).
4- Then click the Assign Purpose button to open the Organization hierarchy purposes window. In here we need to link the Organization Hierarchy you just created in step 3 with the organizational chart portion of AX. To accomplish this, click the Add button to add a newAssigned Category. Once you have created the assigned category, click the Set as Defaultbutton. This will set your configuration as the default one to carry on later on the process.
5- When step 4 has been completed, click the Retail Assortment menu on the left and follow the same process you executed in step 4.
6- When finished you should see the following
7- Then go to Organization Hierarchy and click the Organization Hierarchy view. When the Hierarchy Designer opens, click the Edit button.
8- Click the Insert button and choose Legal Entity
9- The legal Entity (i.e. CEU) will appear in the Retail Store designer.
10- Click as Save as Draft. On the Save Changes windows choose “Save as draft” and click OK.
11- Then you to Retail > Common > Retail Channels > Retail Stores

12- Click New Retail Store and fill the required fields.
13- Go to the miscellaneous fast tab and make sure you have your payment methods. On this, for some reason in my environment, the Credit Card Payment method needed to be setup to 2 and not 02.
14- If all goes OK, you should see the following.
15- Now, go back to Hierarchies to add your new Retail Store to it under your organization. For this, click the Edit button and choose “Keep working on this draft” and click OK.
16- Click the Insert button and choose Retail Channel.
17- From the Retail Channel window choose your new retail store, and click OK.
18- If all is ok, you should see something similar to the picture below.
19- Save your new model as draft again.
20- In order to make the model “official” within AX, we need to publish it. Do this by clickingPublish and Close the Viewer.
21- Select the effective date when you want this model to be active and click the Publishbutton.
22- You should see the following message.
Once you have created your retail store(s), then you can create assortments and assign them to products and/or product groups to be publish into the retail channels. The assortment(s) will then be transferred to the AXRetailPOS database through an N-JOB.
We’re going to create the Call center Retail Channel first, but there are some mandatory fields to set on the Call center, so we’ll need to create the data for that.
Info codesWe’re going to need three Info codes. Head to Retail > Setup > Info codes and createthree, each of with the Input type ‘Subcode list’. Name them as you like, but you can see their purpose from in screen shot below. Aside from being mandatory when creating a Call center, they are not needed for the functionality we are testing.

Create three Info Codes
Warehouse & Customer We’re also going to need to specify a Warehouse and a Default Customer. I assume you’ll already have a warehouse. The Default Customer is, according to the help, used when no Customer exists on the transaction. I don’t know how I will create a Call Center Sales order without defining a customer, but to be on the safe side, I created a customer for this purpose.
Modify ‘Organisation Number’ number sequence (optional)I’m going to change the number sequence that is used when assigning Organisation Numbers, since I don’t want a meaningless number to be used. You don’t have to do this, but you’ll not be able to change the Operating unit number of your Call Center in the next step if you don’t.
Modify the Organisation number Number sequence
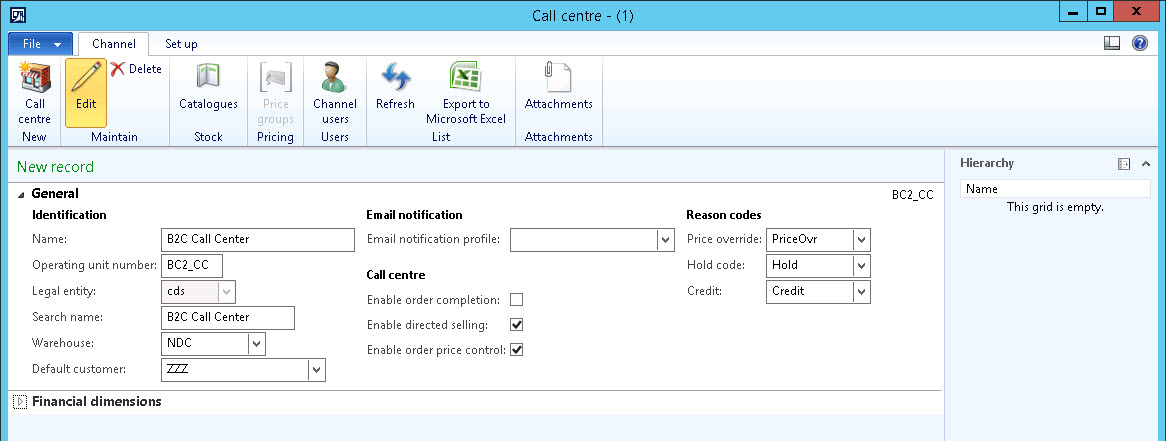
Create the Call Center Head to Retail > Common > Retail channels > Call centers, and hit ‘New Call Center’. Enter all the mandatory data, as per the screen shot below. I’ve also unticked ‘Enable order completion’, since that functionality is not required, and gets in the way of our tests later.
Create the Call Center
In case we forget, we’ll add our user to the Call center now. Click the ‘Channel users’ button, and add your User Id.

Add your user to the Call Center
Now, you’ve done enough to enable Retail functionality on standard AX Sales orders. If you create a new sales order, you’ll see on the header that ‘Retail sale’ is ticked.

Retail Sales Order
From now on, the Sales order can behave slightly differently. But we haven’t done enough to enable Mix and Match pricing. (And, if at any time you want to go back to creating normal sales orders, remove your user from the Call center).
Organisational hierarchy We need to create a Organisational Hierarchy and add our Call Center to it. This setup is required by the Retail Assortment (you can read more about thishere) and would normally represent the structure of all your Retail channels. An Assortment dictates the items that are going to be available in a store, and by using a Retail Organisational Hierarchy you can define which items are available to different groups of stores. Head to Org Admin -> Setup -> Organisation -> Organisation hierarchies and create a New record (I’ve named mine ‘Retail organisation hierarchy’). Hit the ‘Assign purpose’ button. In the form that opens, choose ‘Retail assortment’ (on the left) and then hit ‘Add’. Select the Organisation hierarchy you just created, and hit OK. If that sounded confusing, check the screen shot below. Whilst you’re here, you might as well set it as the default Retail assortment hierarchy.

Create an Organisational Hierarchy for the Retail Assortment
Back on the ‘Organisation hierarchies’ form, select your new Organisational hierarchy and hit ‘View’. You’ll see your hierarchy is empty. Hit ‘Edit’, and the Action pane changes appearance. Click Insert -> Retail channel. Select your Call Center, and click OK. Click ‘Publish and close’ to save the hierarchy. Enter today’s date and hit the Publish button.

Publish the Hierarchy
Category hierarchy Next, we’re going to create another hierarchy. This time it’s a Category hierarchy for our Retail Products – these being the items that we wish to sell via our Call Center. Head to Product information management -> Setup -> Categories -> Category hierarchies, and create a New one with a useful name; I called mine ‘B2C Call Center’, since it will contain products we’re going to sell in the Call Center I’ve called B2C. (Thinking back, it would have been better to call it ‘All Retail Products’ or similar, since we can have only one of this type of hierarchy). On the next form, click ‘New category node’ and name it ‘All’. Since it is the top node in our Category hierarchy, it will contain all the products which we add to this Category hierarchy.

Create a new Category Node
I have three products that I want to add to this Category hierarchy, so I use ‘New category node’ to create three categories below ‘All’, with a bit of a hierarchy going on.

Create a Hierarchy
On that form, that’s all we’re going to worry about. But we do have to set the Category as our Retail Product Hierarchy, which we do at Product information management -> Setup -> Categories -> Category hierarchy types (see the screen shot below).

Set the Category as the Retail Product Hierarchy
We now need to add products to our Category hierarchy. Make sure that some Released Products exist in your company, and head over to Retail -> Setup -> Category hierarchies -> Retail product hierarchy. Expand the ‘Products’ fast tab, and expand all your hierarchy nodes on the left. Select each sub-node and use ‘Add’ to add products at each node. When asked if you wish to ‘Update Product properties’, hit No. When that is done, head to the Released products form, and on one of those products hit the ‘Product categories’ button in the Action pane (‘Product’ tab -> ‘Setup’ area). You’ll get confirmation of the selection you made, and indeed we could have added Products to our Category Hierarchy this way too.
AssortmentNext, we create an Assortment. Head to Retail -> Common -> Assortments and hit New Assortment. I enter an Assortment Id (again, I modified the relevant number sequence to allow this – it’s not important) and an Assortment name. Then, on the ‘Retail channels’ fast tab, I hit ‘Add line’. Here, you’ll see evidence of the Organisation Hierarchy we created at the start of this exercise. With a full store hierarchy, it would be possible to add a group of stores or call centers to this Assortment. Go ahead and add your Call center to the Assortment.

Create a Retail Assortment
Then, on the ‘Products’ fast tab, hit ‘Add line’. Set the Category to ‘All’, and make sure ‘Include’ is selected.

Add the Products to the Assortment
When you’re done, hit the Publish button in the Action pane. This fires off a Batch job called ‘Retail Assortments’, and you should check to see that the job reaches the status ‘Ended’.
The batch job Publishes the Assortment
Back on the Assortments List Page, your Assortment should have the status ‘Published’.
The Published Assortment
Retail Catalogue
The last step is to create a Retail Catalogue. Here, we choose the Products from our Assortment that we want in our Catalogue. Unfortunately, to Approve a Retail Catalogue, we have to configure Workflow. Whilst it is not hard, I have not included all the steps to do this since it relies on Workflow actually working in your environment. If I get some comments to include this setup, I’ll add it at a later date. Please configure the workflow to approve a Retail catalogue now, since you won’t be able to get past the ‘Validate’ stage if you don’t.
The last step is to create a Retail Catalogue. Here, we choose the Products from our Assortment that we want in our Catalogue. Unfortunately, to Approve a Retail Catalogue, we have to configure Workflow. Whilst it is not hard, I have not included all the steps to do this since it relies on Workflow actually working in your environment. If I get some comments to include this setup, I’ll add it at a later date. Please configure the workflow to approve a Retail catalogue now, since you won’t be able to get past the ‘Validate’ stage if you don’t.
Head to Retail -> Common -> Catalogues -> Catalogues. Hit ‘New Catalogue’. Now, I’m setting this up in an empty instance of AX, and when I did this I got the error ‘Unable to find any record in the DirPartyTable table for current user userid’. I could not create a catalogue. To get past this, I had to create an Employee for myself, and assign that Worker to my AX user id. Then, I created a Catalogue called ‘Spring 2015′. I can see it has stamped my Worker as the Owner of the catalogue. I add my Call center on the ‘Retail channel’ fast tab, and then hit ‘Add products’ in the Action pane. As with the Assortment, I add All products to the Catalogue.

Create a Retail Catalogue
Then, I Validate the catalogue.

Validate the Retail Catalogue
I am them able to submit the catalogue to workflow for Approval. Once approved, Publish the catalogue using the button on the Action pane.
The Catalogue is Published
Mix and Match Discount
Now we get to the setup for the Mix and Match discount that we are going to use to get the Buy One Get One Free functionality. I have already posted a Price/Discount Agreement to set the price of my item at £500 for all customers.
Now we get to the setup for the Mix and Match discount that we are going to use to get the Buy One Get One Free functionality. I have already posted a Price/Discount Agreement to set the price of my item at £500 for all customers.

The sales price of my item is £500
Next, I need to create a Retail Price Group. At Retail -> Setup -> Pricing and discounts -> Price groups, create a new Price group and tick the ‘Retail’ tick box.

Create a Retail Price Group
Go back to your Call center (Retail -> Common -> Retail channels -> Call center) and add this price group to it.

Add the price group to your Call center
At Retail -> Setup -> Pricing and discounts -> ‘Mix and match line group setup’, create a line group which will cause the discount to be activated if two products are bought.

Create a Mix and Match Line Group
Finally, we need to create the Mix and Match Discount. Head to Retail -> Common -> Pricing and discounts -> Mix and match discounts. Create a new Discount and give it a name. Hit the ‘Price groups’ button, and select your price group. Hit the ‘Mix and match line groups’ button and select the line group you just created.
Per the screenshot below, set the Discount type to ‘Least expensive’. Set it that 100% discount will be given to the least expensive line. On the Lines fast tab, add your Product(s) and set the Line group.

Create the Mix and Match Discount
Then set the status of the discount to ‘Enabled’. And you’re done! All you need to do now is test it.
Buy one, get one free
Create a Sales order for the item for a Quantity of 1. As expected, no discount is applied:
Create a Sales order for the item for a Quantity of 1. As expected, no discount is applied:

No discount is applied
Alter the quantity to, say, 2. You are prompted to re-calculate all prices. HIT ‘YES’!

Buy One Get One Free!
You’ll see the line splits into two. One line has the full unit price, and no discount. The other has a discount amount equal to the unit price and zero net amount.
I say, you buy one, you get one free
Notice that if you attempt to delete the line which has no discount, AX automatically ensures the discount on the remaining line disappears.
So, a lot of setup to get one small result, but it also opens up a whole possibility of Retail functionality on the sales order
Thanks for sharing the info, keep up the good work going.... I really enjoyed exploring your site. good resource... retail business management services
ReplyDeleteRetail POS Software in UAE, Single Lisence Software in UAE, Cashiers Software in UAE
ReplyDeletehttps://gccgamers.com/retail-pos-software.html
Retail Software in UAE, Safe Shopping Multiple Payment Options Express Delivery GCC Gamers Moneyback Guarantee.
1634614579868-15
Impressive Post!!! Thanks for sharing this data with us.
ReplyDeleteDevOps Techniques
Importance of DevOps