Cash and Bank management setup
This article presents the basics setup for the cash and bank management module in Dynamics AX 2012. This module can be used to maintain the legal entity’s bank accounts and the financial instruments that are associated with those bank accounts.
To be able to use the Cash and Bank management module, you need to setup several components:
- Bank transactions types: Set up the types of transactions that are made in bank accounts, such as deposit slips, fees, and interest charges. Transactions types are used in the bank reconciliation functionality.
- Bank transactions group: groups of transaction types. Transactions group are used in the bank reconciliation functionality
- Cash and bank management parameters: select the parameters for the module and select number sequences for the automatic numbering of bank documents.
- Payment purpose codes: you can create payment purpose codes for the central bank.
- Bank reasons: create bank reason code you can use to explain why some types of transactions were entered or why some field values were changed.
- Bank group: setup general information about the bank groups in which you have several bank accounts.
- Bank accounts: setup informations for bank accounts.
- Journal names: setup two journal names for the desposit slip or check cancellation
- Payment layout: setup the layout for cheque, promissary note and bill of exchange.
1/ Prerequisites
Before setting up the bank module, you must setup several number sequences :
- Access: Organization administration > Common > Number sequences > Number sequences
- 3 number sequences must be created for the Bank parameters:
- Automatic number for “Deposit slip”
- Automatic number for “Prenotes”
- Automatic number for “Bank reconciliation”, allocated for voucher created in bank reconcialiation.
2/ Step 1: Bank transactions types
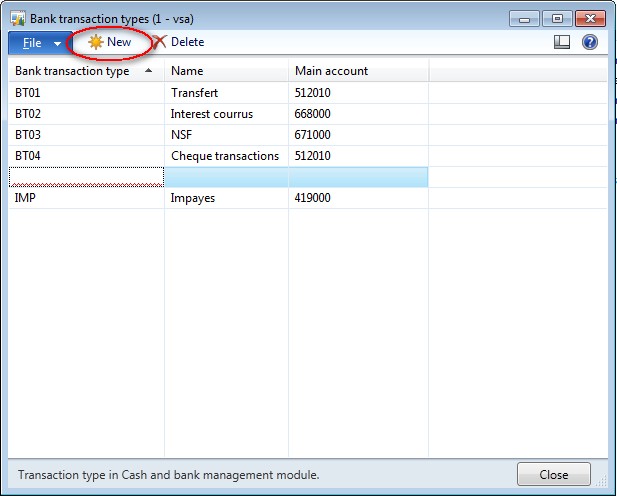
Bank transactions types are used in the bank reconciliation functionality. You need to create bank transaction types for the transactions that are made in a bank account. The bank transaction type can be linked to a methods of payment or enter in a bank transaction (AP, AR or GL journal). For the cash and bank parameter you need at least one bank transaction type for the unpaid transaction (not sufficient fund).
Access: CBM > Setup > Bank transaction types
- Click on New
- Enter a code that you can easily identify.
- Enter a name
- Select the main account to use in case of a creation af a vouher during the bank reconciliation (posting correction or adding a record)
3/ Step 2: Bank transaction groups
Bank transaction groups are used in the bank reconciliation functionality. They are used in the reconciliation form to calculate subtotals. It can facilitate the bank reconciliation. For exemple, if in your bank statement you have a subtotal for all the transfer, you can create a bank transaction group that contain all the bank transaction types relatif to a transfer (like direct debit, internet transfer, paper transfer, …)
Access: CBM > Setup > Bank transaction groups
- Click on New
- Enter a Code
- Enter a description for the group
- In the Type tab, click on “Add” to add a transaction type.
4/ Step 3: Cash and Bank management Parameters
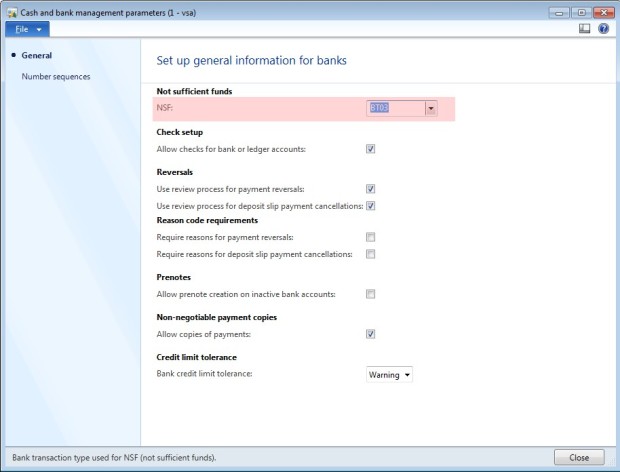
Access: CBM > Setup > Cash and Bank management Parameters
- Go to the general tab
- NSF: select the bank transaction type to use for not sufficient funds.
- Allow checks for bank or ledger accounts: select this check box to enable checks to be printed for a bank account or ledger account.
- Use review process for payment reversals: select this check box to require that check reversals be reviewed in the Check reversals journal before they are posted. If you do not select this option, the reversal is posted immediately when you click Payment reversal in the Check form.
- Use review process for deposit slip payment cancellations: select this check box to require that cancellations of deposit slip payments be reviewed in the Deposit slip payment cancellations journal before they are posted. If you do not select this option, the cancellation is posted immediately when you click Cancel payment in the Deposit slips form.
- Require reasons for payment reversals: select this check box to require that a reason code be selected before a payment reversal can be posted. If you select this option, you need to setup reason code for the bank module.
- Require reasons for deposit slip payment cancellations: select this check box to require that a reason code be selected before a cancellation of a deposit slip payment can be posted. If you select this option, you need to setup reason code for the bank module.
- Allow prenote creation on inactive bank accounts: select this check box to let users create prenotes for customer bank accounts and vendor bank accounts that are inactive.
- Allow copies of payments: select this check box to let users print copies of payments (checks, promissory notes and electronic payments).
- Bank credit limit tolerance: select how to notify the user when a payment journal that is posted causes a balance to exceed the credit limit (None, Warning or Error). The credit limit is setup in the bank account (general tab).
- Go to the Number sequences tab
- Select the number sequence for each reference used in the company.
5/ Step 4: Payment purpose codes
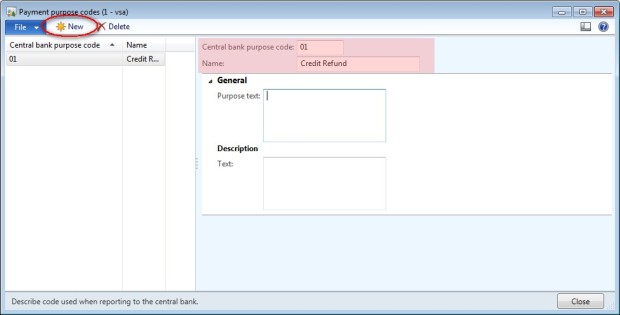
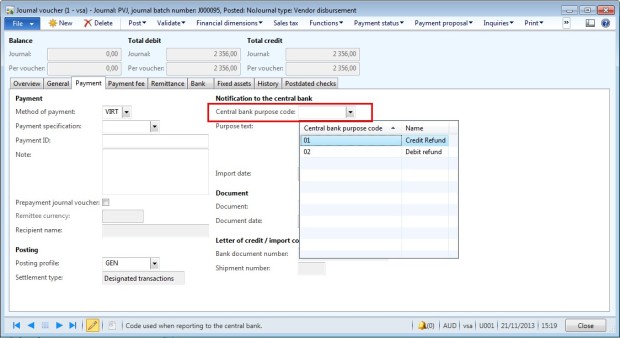
If you need to use payment code for the central payment, you need to setup payment purpose codes. The payment purpose code will be used in the payment journal form.
Access: CBM > Setup > Payment purpose codes.
- Click on New.
- Enter a code.
- Enter the name of the code.
- In the field Purpose text, you can add a description of the payment purpose code.
- In the field Text, you can information if needed.
- The payment purpose code will be used in the payment journal form (payment tab).
6/ Step 5: Bank Reason
Access: CNM > Setup > Bank reasons or all reason codes can be created in Organization Administration > Setup > Financial reasons
- Click on New
- Enter a Reason code
- Enter a description in the field “Default comment”
- Select “Bank”
7/ Step 6: Bank groups
You can create a bank group if you have several bank accounts in the same bank. In the bank group you can set up general information common to all bank accounts. When you will create a bank account, all general informations from the bank group will be filled.
Access: CBM > Setup > Bank groups
- Click on New
- Enter a Bank group code,
- Enter the Routing number,
- Enter a description (name of the bank).
- Select a routing number type if needed and enter the company Id.
- Select the currency of the bank.
- Enter a Post account if needed (used in Europe).
- Enter the number of days that the bank need for feedback on payment (unpaid)
- Enter the suffix and the drawer number.
- Enter an address and contact information if the data are common for all the accounts of the group.
8/ Step 7: Bank accounts
In this form you can set up all informations for your bank accounts. In this form, you can also manage the customer or vendor accounts. To have more details about this form, go to Technet microsoft / Bank account form.
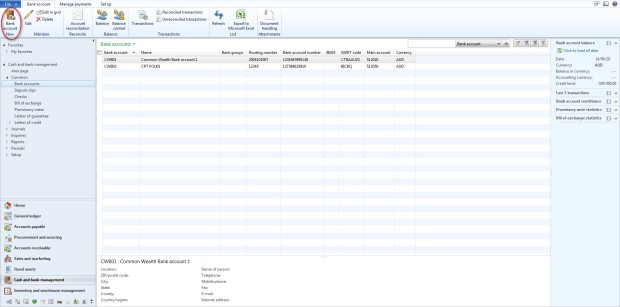
Access: CBM > Common > Bank accounts
- Click on New bank account
- If you have crated a bank group, select it in the tab General.
- All information entered in the bank group are filled in the bank account
- Enter the bank account datas:
- In the field Bank account: enter the internal bank account number.
- In the field Bank account number: enter the bank account number from the bank.
- Enter others information given from your bank: CIN, Swift, Iban, …
- Select the “Prenote required”check box if the bank requires prenotes for electronic transactions.
- Enter the number of days that the bank requires to process a prenote.
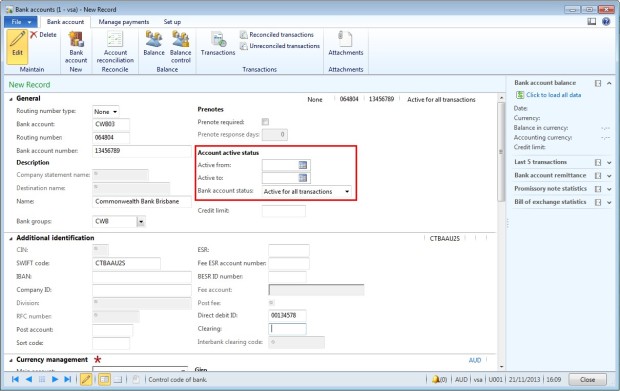
- Enter the date when the bank account will become active and will be available for new transactions. If you do not enter a date, the bank account is immediately available for new transactions.
- Enter the date when the bank account will no longer be active for new transactions. If you do not enter a date, the bank account remains active indefinitely.
- Select the status to use for the bank account: Active for all transactions, Inactive for new transactions or Inactive for all transactions.
- Enter the credit limit for the bank. You must enter a negative amount in this field. You are notified if the bank balance exceeds this limit when you post a payment journal, if this option is selected in the parameters form.
- In the currency management tab:
- Select the main account linked to the bank account.
- Select the currency of the account
- Enter a payment journal to use in case of unpaid payment.
- In the tab Negociable instrument
- Select a journal for the remittance fees that are generated for bills of exchange or promissory notes
- Enter the fee that is paid to the bank account every time that a remittance that is related to a bill of exchange is collected.
- Enter the fee that is paid to the bank account every time that discount interest is added to bills of exchange that are represented in a remittance file.
- Enter the fee that is paid to the bank account every time that discount interest is added to promissory notes that are represented in an invoice remittance file.
- Select the main account to use for collections expense fees for bills of exchange, discount interest fees for bills of exchange and invoice remittance fees for promissory notes
- In the tab Address, add the address of the bank: click on New
- Enter information about the person to contact in the bank.
- You can select default financial dimension for the main account
9/ Journal names
To do payment reversal, you need to create several journal names.
Access: GL > Setup > Journals > Journals names
- Create a new journal name for check reversal: Select journal type “Bank check reversal”
- Create a new journal name for deposit slip payment cancellation: Select journal type : “Bank deposit slip cancellation”
10/ Other
- For the layout set up, go to this article: “Payment layout setup”
- For the advanced bank reconciliation import set up , go to this article: “set up advanced bank reconciliation import”

