Friday 19 August 2022

Gate Management -Challan in D365 FO

Gate Management

Overview

A gate entry for goods that are entering (Inward) and exiting (Outward) an organization, create the Gate Entry record details about goods that are entering /Outward an organization.

A gate entry record involves the following tasks

  1. Record a material receipt
  2. Measure quantities of material received
  3. Weigh the empty vehicle after unloading the material
  4. Record the exit of the vehicle
  5. Prepare a receipt document for the gate entry

We can assign gate entry for following documents transactions as below and there is no inventory impact till the particular document transaction complete.

  • Purchase order,
  • Sales order,
  • Transfer order
  • Return order.

Setup

By Click Inventory management > Setup > Inventory breakdown > Site.


On the Sites form, on the Number sequence Fast Tab, specify the number sequence for Gate inward and Gate outward.


Can create site wise number sequences.

Create gates for a site and then indicate whether the gate is an entry gate or an exit gate. 

Many gates can be created for a site and multiple gates can be defined as entry gates or exit gates.

To create entry and exit gates for a site, follow these steps

Click Inventory management > Setup > Inventory breakdown > Inventory site gate.

Click New.


Specify whether the gate is an entry gate or an exit gate in the Gate type field.

Select the site location for the gate in the Site field.

Enter the gate ID in the Gate field.

Close the form.


To create a gate entry record, follow these steps:


Click Inventory management > Periodic > Gate management > All inward gate entries.

Click New > Inward gate entry.


On the Inward gate entry header FastTab, select the factory gate and the warehouse.

Select the reference document type and reference party that is based on the reference document type.

Enter the transport details such as the lorry receipt, railway receipt number, or an air waybill number (LR/RR/AWB), the vehicle number, and the transporter name.

Select the LR/RR/AWB date and the challan date. 

Enter challan number, the origin from which the goods are transported, the driver’s name, and a description of the goods being sent to the organization. 

On the Inward gate entry lines FastTab, specify the details about the goods, quantity of goods ordered, and received quantity of items in the challan. 

Click Confirm vehicle entry The Status field is updated, and the vehicle entry time and date are recorded. 

Optional: On the Action pane, click Print > Show gate entry to print the gate entry slip. The gate entry details are updated in the related reference documents, such as the posted purchase product receipt, posted sales return order packing slip, or the posted transfer order.

On the Line details FastTab, on the Measurement tab, enter the manufacturer assigned number for the goods, the instrument that is used to measure the goods, the quantity of received goods, and the unit of measurement.

Click Confirm measurement.

On the Line details FastTab, on the Tare check tab, enter the tare weight of the goods and the unit of measurement.

Click Confirm tare check and then click Confirm vehicle exit. The vehicle exit date and time are saved. The reference documents such as the product receipt, sales return order packing slip, and transfer receipt are updated with the gate entry and measurement details.


Reference Document Type for Inward Gate Entry

  • OthersThe reference party is not applicable when the Reference document type field is set as Others.
  • Purchase OrderThe reference party are applicable when the Reference document type field is set as Purchase Order.
  • Sales Return OrderThe reference party are applicable when the Reference document type field is set as Sales Return Order.
  • Stock Transfer-InThe reference party are applicable when the Reference document type field is set as Stock Transfer-In.
  • Sub -contract returnThe reference party are applicable when the Reference document type field is set as Sub -contract return
  • RGP Return (Returnable Gate Pass) -The reference party are applicable when the Reference document type field is set as RGP Return.
    • A returnable gate pass is issued for materials that exit the premises and is returned (or materials that enter your facility and has to be sent back).
    • A non-returnable gate pass is issued for materials that enter the gates of your facility and do not exit (or exits your premises and is not to be returned).

Note

The Confirm measurement and Confirm tare check buttons are disabled when the Reference document type field is set to Others, or the Skip measurement check box is selected.


Example of "Purchase Order" Reference Document Type


Create Purchase Order and Select Gate Entry


Example of "Other" Reference Document Type


Friday 5 August 2022

Requested Date and Requirement Date Calculation on Planned Orders and Pegging Form in Dynamics 365 Finance and Operations

Planned Order forms:

Requirement Date: 

This is the date when the customer needs the order to be shipped. In the case of Production, this is the date by which the item should be made. In the case of Forecast it will be the date of the forecast. If the original date that the customer requested cannot be met, then this date becomes the actual date that the request can be met.

Requested Date:  

If the requirement date cannot be met, then the system will show the original date as the requested date and the requirement date will show the date when the requirement can be met.

Scenario 1: We will use Sales orders to drive the planned orders.
In the example below the sales order has a ‘Requested Ship Date’ of 09/11/2020


  • If we run the Master planning, we should see the requirement date as 9/11/2020 on the planned order


  • On the pegging tab, the ‘Requirement date’ is as 9/11/2020


  • In this case there is no ‘Requested date’ on the pegging tab.

Scenario 2: Lets change the Requested ship date on the Sales order to 8/27/2020, so that the order cannot be delivered to the customer in time.


  • In this example the system cannot meet the requested date and so we will get futures and action messages.
    We see the requested date in this case is 8/27/2020, which was our requested ship date.


  • But when we look at the requirement date, it shows a date of 9/8/2020. That is the date we can make this item and ship it to the customer.


  • The requirement date on the Pegging remains at 8/27/2020.


  • In this example the ‘Add calculated delays to requirement’ date was checked


Scenario 3: Lets uncheck the ‘Add calculate delays to requirement date’ and run the master plan again.


  • The requested date on the planned order is still 8/27/2020


  • The Requirement date on the Planned order is 9/1/2020


  • The system ignores the delays in procurement of the raw material and considers that the order can be started on the next working day.


  • The Beta carotene is delayed but the system does not account for the delay as the ‘Add calculate delays to requirement date’ is not checked.

Scenario 4: Requested date on the Pegging

The Sales order is set with a Requested ship date of 9/15/2020


  • Set the Issue Margin on the coverage group or the Master plan to 2 days


  • Run the master planning again
    The requirement date and the requested date on the planned order are set to 9/9/2020 (9/11/2020-2 days)


  • On the Pegging the Requirement date =09/09/2020 and the Requested date =09/11/2020. So the requested date represents the shipment date whereas the requirement date takes the margin into account.


Scenario 5: The Sales order Requested Ship date is set to 09/05/2020 which is a Saturday

Run the master planning again


The Requested date is 09/4/2020 and the Requirement date =09/08/2020 on the Planned order


  • The pegging shows the requested date of 09/5/2020 and the requirement date of 09/04/2020.

Scenario 6: Set the Receipt Margin added to requirement date as 1


  • The pegging on the planned order shows the Requested day of 09/05/2020 and requirement date is 09/04/2020

The Requested date for the planned order moves to 09/03/2020 as there is a receipt margin of 1 day


The table below shows the summary of the various cases that have been discussed in this blog


Monday 1 August 2022

Process Demand forecasting AX D365 FO

Take on newly created item and adjust the on-hand inventory for one of the materials

Post the adjustment journal for product D0003 to adjust the inventory level for that product to 0 (zero).

1. Select Inventory management > Item > Inventory adjustment.

2. Select journal 00080.

3. Select Post.

Create a demand forecast

Create a demand forecast for product D0003.

1. Select Product information management > Products > Released products.

2. Filter on product D0003.

3. On the Plan tab, in the Forecast group, select Demand forecast.

4. Select New.

5. On the forecast line, set the following values:

●Model: CurrentF

●Sales quantity: 200

6. Select Save.

7. Select Allocate forecast.

8. In the Allocate forecast dialog box, set the following values:

●Method: Period

●Per: 1

●Unit: Month

●End: One year from the current date

9. Select OK.

The Allocation section now shows the monthly forecast for product D0003.


Run master planning

1. Select Master planning > Workspaces > Master planning.
2. In the Plan field in the upper-left corner, select Master.
3. On the Master planning tile, select Run.
4. In the Master planning dialog box, select OK.


1. Select the Planned orders tile to show the list of planned orders.
2. Filter on product D0003. Select Item number as the context.


3. In the filtered list, select the first planned order.
4. Select Firm.
5. In the Firming dialog box, set the Update marking option to No. 10 Select OK.


Process the production order

1 Select Production control > Production orders > All production orders.

2    Filter on item number D0003.

3    On the Production order tab, in the Process group, select Release to release the production order.

4    On the Production order tab, in the Process group, select Start to start the production order.

5    In the Start dialog box, on the General tab, set the following values:

      Automatic route consumption: Never

      Post picking list now: No

      Post route card now: No


6. Select OK.
7. On the View tab, in the Journals group, select Picking list to open the Picking list journal page.
8. Select the journal number to open the Journal lines section.
9. In the Journal lines section, adjust the Consumption value for the following line items:
●On the line for item M0001, change the value from 200 to 203.
●On the line for item M0002, change the value from 200 to 201.
●On the line for item M0003, change the value from 200 to 205.
●On the line for item M0004, change the value from 200 to 202.
●On the line for item M0007, change the value from 200 to 210.


10. Select Post.
11. In the dialog box for posting the journal, select OK.
12. On the View tab, in the Journals group, select Job card to open the Job card journal page.
13. Select New.
14. In the Create production journal dialog box, in the Name field, select Job. 15 Select OK.
16. Select New to create a journal line for each of the four jobs. Use the following values.

Assembly
    ●Hours: 52
    ●Good quantity: 200
Testing
    ●Hours: 38
    ●Good quantity: 200
TestOpr
    ●Hours: 45
    ●Good quantity: 200
Packing
    ●Hours: 15
    ●Good quantity: 198
    ●Error quantity: 2
    ●End: Yes
    ●Operation complete: Yes
    ●Production reported as finished: Yes


17. Select Post.
18. In the dialog box for posting the journal, select OK.
19. On the Production order tab, in the Process group, select End to end the production order.

Understanding Demand forecasting AX D365 FO

Demand forecasting is modular and easy to configure. You can turn the functionality on and off by changing the configuration key at Trade > Inventory forecast > Demand forecasting.


Demand forecast variant conversion limitation

Unit of measure (UOM) per variant conversion is not fully supported when generating demand forecast if inventory UOM is different than the demand forecast UOM.

Generating forecast (Inventory UOM > Demand forecast UOM) uses product UOM conversion. When loading historical data for the demand forecast generation, the product level UOM conversion will be always used when converting from inventory UOM to the demand forecast UOM, even if there are conversions defined on the variant level.

Item allocation keys

Item allocation keys establish groups of items. A demand forecast is calculated for an item and its dimensions only if the item is part of an item allocation key. 

An item and its dimensions must be part of only one item allocation key if the item allocation key is used during forecast creation.

To create item allocation keys and add a stock keeping unit (SKU) to them, follow these steps.


1.    Go to Master planning > Setup > Demand forecasting > Item allocation keys.
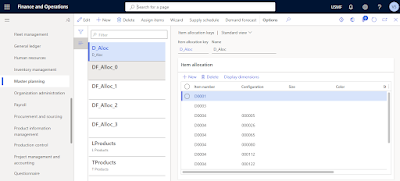


2.    Either select an item allocation key in the list pane, or select New on the Action Pane to create a new one. On the header for the new or selected key, set the following fields:

·         Item allocation key – Enter a unique name for the key.

·         Name – Enter a descriptive name for the key.

3.  Follow one of these steps to add items to the selected item allocation key or remove item

On the Item allocation FastTab, use the New and Delete buttons on the toolbar to add or     remove items as needed. For each row, select the item number, and then assign dimension values in the other columns as you require. Select Display dimensions on the toolbar to change the set of dimension columns that is shown in the grid. (The value in the Percent column is ignored when demand forecasts are generated.)

 If you want to add a large number of items to the key, select Assign items on the Action Pane to open a page where you can find and assign multiple items to the selected key.

Set up Demand forecasting parameters

Use the Demand forecasting parameters page to set up several options that control how demand forecasting will work in your system.

Open the Demand forecasting parameters page

To set up demand forecasting parameters, go to Master planning > Setup > Demand forecasting > Demand forecasting parameters. Because demand forecasting runs cross-company, the setup is global. In other words, it applies to all legal entities (companies).


General settings

Use the General tab of the Demand forecasting parameters page to define general settings for demand forecasting.


Demand forecast unit

Demand forecasting generates the forecast in quantities. Therefore, the unit of measure that the quantity should be expressed in must be specified in the Demand forecast unit field. This field defines the unit that will be used for all demand forecasts, regardless of the usual inventory units for each product. By using a consistent forecast unit, you help ensure that the aggregation and percentage distribution make sense.

Transaction types

Use the fields on the Transaction types FastTab to select the transaction types that are used when the statistical baseline forecast is generated.

Demand forecasting can be used to forecast both dependent demand and independent demand.

For example, if only the Sales order option is set to Yes, and all the items that are considered for demand forecasting are items that are sold, the system calculates independent demand.

However, critical subcomponents can be added to item allocation keys and included in demand forecasting. In this case, if the Production line option is set to Yes, a dependent forecast is calculated.

You can override transaction types for one or more specific item allocation keys by using the Item allocation keys tab. That tab provides similar fields.


Override default forecast algorithm parameters globally

Default forecast algorithm parameters and values are assigned on the Demand forecasting parameters page (Master Planning > Setup > Demand forecasting > Demand forecasting parameters). 

However, you can override them globally by using the Forecast algorithm parameters FastTab on the General tab of the Demand forecasting parameters page. (You can also override them for specific allocation keys by using the Item allocation keys tab on the Demand forecasting parameters page.)

Use the Add and Remove buttons on the toolbar to establish the required collection of parameter overrides. 

For each parameter in the list, select a value in the Name field, and then enter an appropriate value in the Value field. All parameters that aren't listed here will take their values from the settings on the Demand forecasting parameters page. 

Set forecast dimensions

A forecast dimension indicates the level of detail that the forecast is defined for. Company, site, and item allocation key are required forecast dimensions. You can also generate forecasts at the warehouse, inventory status, customer group, customer account, country/region, state, and/or item level, and at all item dimension levels. Use the Forecast dimensions tab on the Demand forecasting parameters page to select the set of forecast dimensions that is used when the demand forecast is generated.

At any time, you can add forecast dimensions to the list of dimensions that are used for demand forecasting. You can also remove forecast dimensions from the list. However, manual adjustments are lost if you add or remove a forecast dimension.


Generate a statistical baseline forecast

When you create a baseline forecast, you must first specify the parameters and filters that are used in the calculation.

For example, you can create a baseline forecast that estimates demand based on transaction data from the past year for a specific company, for the coming month, and for a selected group of items.

To generate a demand forecast, go to Master planning > Forecasting > Demand forecasting > Generate statistical baseline forecast.

The forecast bucket can be selected at forecast generation time. The available values are: Day, Week, and Month.

The number of buckets to generate a forecast for is set in the Forecast horizon field.


When the forecast strategy is set to Copy over historical demand, the end of the historical horizon is ignored. The system copies the number of buckets specified in the Forecast horizon field to the forecast demand, starting from the date set in the From date field under Historical horizon. By copying historical demand from a certain date forward, production planners can make the plan for the next quarter in two ways:

·         By copying the demand from the same quarter last year.

·         By copying the demand from the previous quarter.

To prevent confusion in the production plans, a certain number of forecast buckets can be frozen. This number is set in the Freeze time fence field. 


On the Adjusted demand forecast page, the cells for the frozen buckets are disabled, to give a visual indication that those values should not be changed.

The start date for the baseline demand forecast doesn’t have to be the current date or a date in the future.

To set a different start date, use the Baseline forecast start date - From date field. For example, in June, users can generate a forecast for the next year. Because the forecast buckets between the end of historical demand and the start of the baseline are missing, the predictions might not be accurate.

The Baseline forecast start date - From date field has to be set to the beginning of a forecast bucket, for example, in the United States, a Sunday if the forecasting bucket is the week. The system automatically adjusts the Baseline forecast start date - From date field to match the beginning of a forecast bucket.

The Baseline forecast start date - From date field can be set to a date in in the past. In other words, it is possible to generate a demand forecast in the past. This is useful, because it lets users adjust the forecast service parameters so that the statistical forecast generated in the past matches the actual historical demand. Users can then continue using these parameter settings to generate a statistical baseline forecast for the future.

Manual adjustments made in previous demand forecasting iterations can be automatically applied to the new baseline forecast if the Transfer manual adjustments to the demand forecast check box is selected. If the check box is cleared, the manual adjustments are not added to the baseline forecast – but they are not deleted. Manual adjustments made to a forecast can be deleted only at forecast import time, by clearing the Save the manual adjustments made to the baseline demand forecast check box. Manual adjustments are saved at authorization time. Therefore, if a user makes manual adjustments to the forecast, but doesn’t authorize the forecast back to Supply Chain Management, the changes are lost. For more information about manual adjustments and how they work,

A demand forecast generation can have a name and comments to help users identify the forecast that has been generated. These values are visible in forecast generation history on the Statistical baseline forecast generation history page.

The intercompany planning group, item allocation keys, and other filters can be applied at forecast generation time. These can be used to improve performance or to split the data into manageable chunks. However, note that a demand forecast is not generated for the members of any item allocation key that is not associated with an intercompany planning group, even if the item allocation key is selected in the query.