Tuesday 29 September 2015

Vendor Rebate Agreement

Vendor Rebate Agreement is a setup of Vendor Purchase Condition at the time of purchasing
Click Procurement & Sourcing > Set up > Procurement & Sourcing Parameters
Rebate
Rebate Program Type, Vendor Group and Item Group
Rebate Program type is a type that needs to Represent a Vendor Rebate
  1. Click Procurement and sourcing > Setup > Rebate program > Rebate program types.
  2. Click New, and enter an ID and description for the program type.
  3. Select a default accrual account and expense account.
Rebate
If you want a rebate agreement to apply to a group of vendors, then you need to create a Vendor Rebate Groups
  1. Click Procurement and sourcing > Setup > Rebate program > Vendor rebate groups.
  2. Click New, and enter a name and description for the vendor rebate group.
Rebate
Similarly if  you want a rebate agreement to apply to a group of items, then you need to create a Item Rebate Groups
  1. Click Procurement and sourcing > Setup > Rebate program > Item rebate groups.
  2. Click New, and enter a name and description for the item rebate group
Rebate
Rebate Agreements
The rebate agreement defines which products are included in the rebate offer, which vendors offer the rebate, and how the rebate is calculated.
To create the Rebate Agreement, navigate the following steps:
  1. Click Procurement and sourcing > Common > Rebates > Rebate Agreements
  2. Click New to create a New record.
  3. Once created New, select a Rebate Program ID.
  4. Select a Vendor in accordance with the selection that the user has taken in the Vendor code.There are three types of Vendor Code-
    1. Table > Applicable For only one specific Vendor
    2. Group > Applicable For only Vendor Rebate Group. Means all the vendors that come under this particular Rebate group are applicable
    3. All > Applicable for all the vendors.
    There are three types of Item Code-
    1. Table > Applicable For only one specific Item
    2. Group > Applicable For only Vendor Rebate Item Group. Means all the items that come under this particular Rebate item group are applicable.
    3. All > Applicable for all the Items.
    Rebate
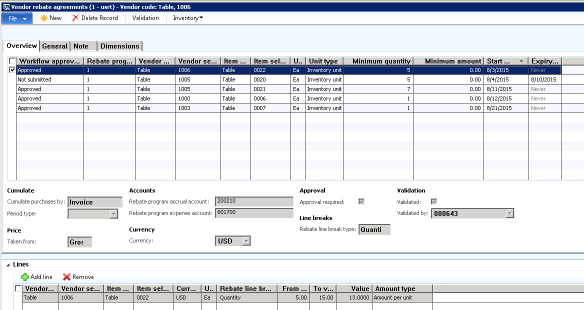
Note: In this case, we have taken Vendor as 1006 and Item as 0022. That means whenever a Purchase order is being created for the Vendor 1006 taking the item line as 0022, then a rebate of certain percentage will be given which needs to be defined in the lines.
5. In the Overview, a minimum quantity is given as 5. That means the rebate agreement is applicable on minimum purchase of 5 quantity.
6. In the lines, click Add button. In the from value give 5 and in the To value give 15. The value is given as 13. That means when a purchase of item 0022 will be done from the quantity 5 to 15, a rebate of 13 per unit will be given.
Note: Amount type can be of per unit or percentage.
Rebate
7. Once the record has been created, the agreement needs to be Validated. Click on the Validation button to get it validated.
Rebate
Rebate
After clicking OK, the status of the Rebate becomes Approved.
Now up to this the the Rebate Agreement has been created. Now its the time to see the impact of its. For this we need to create a Purchase order and invoice it.
Purchase Order Creation and Invoicing
  1. Created a Purchase order with the same vendor, same item and same quantity range that we have given in the Rebate Agreement.
Rebate
2. Confirm the Purchase Order. Receive it and then Invoiced it.
3. Once the order is Invoiced, click on the Purchase Order Line > View > Price Details in order to see the effected Rebate Agreement.
Rebate
Rebate

Calculation: Since the quantity in the PO is 10 and the amount for rebate is 13 per quantity, so a Rebate amount of 130 came into the Starting Rebate Amount.
Process Rebate Claims
Rebate for 130 has been activated in our case after Invoice because in the Rebate Agreement we have given Invoice in the Cumulate Purchase Types.
Rebate
To process the rebate:
  1. Navigate to Procurement & Sourcing > Common > Rebates > Rebates.
  2. Your record along with the Invoice number will be displayed.
  3. Select the record and click Approve.
Rebate
4. Once the Approve button is clicked, system will ask to enter the vendor Account. Select the vendor account and then click OK.
Rebate
5. Once OK is clicked, the Voucher will get posted.
Rebate
6. Navigate to General Ledger > Journal > General Ledger. Select the posted record and click on lines.
Rebate
7. Now coming back to  Procurement & Sourcing > Common > Rebates > Rebates.    Click Process to Process the Rebate.
3
8. Once process is clicked, system will ask for the vendor. Select the required vendor from the query form and then click Ok.
1
9. Upon clicking OK, vendor invoice will get created.
3
10. After the rebate voucher gets posted, click on the Rebate Transactions to see the vouchers. At this point the status also gets to Completed.
3
11. Rebate Transactions will show the Vendor invoice. Right click and click view details.
3
12. A pending invoice of -130 amount has been created. Now this needs to be Invoiced and thus a rebate of -130 has been given.
3
The same functionality is applicable for the Customer Rebate also. But the navigation path is- Sales & Marketing > Common > Rebates > Rebate Agreements.

Friday 11 September 2015

Connect Mobile Device With Dynamics AX

Connect a mobile device like a smartphone with Dynamics AX using web services. Microsoft Dynamics AX 2009 with AIF Webservices installed and Visual Studio for Smart Device development.

Deploy AIF Service

  1. Go to Basic → Setup → Application Integration Framework → Services
  2. Select Refresh button to update service list
  3. Enable CustCustomerService
  4. Generate the webservice
    Aif Services
    Aif Service
  5. To verify your service is working open the IIS manager
  6. Go to → Sites → Default Web Site  → MicrosoftDynamicsAxAif50  → Content View
    IIS 7 Manager on Windows Server 2008
    IIS 7 Manager on Windows Server 2008
  7. Right Click on CustomerSerivce.svc and Browser
  8. You should see a web page with a link to a WSDL file
  9. Follow the link an you should see an XML document containing the service contract

Mobile Device Project

  1. Open Visual Studio and Create a new Solution
  2. Add a new Smart Device Project
  3. Go to References and add a new service reference
  4. Provide the URL of your Dynamics AX CustomerService
  5. Open Form1.cs file
  6. Add a text field (Name: textBoxAccountNum),
    a button (Name: buttonLookup)
    and a label (Name: labelName) to your form
  7. Double Click on the button and implement the service call:
private void buttonLookup_Click(object sender, EventArgs e)
{
    System.Net.NetworkCredential credentials = new System.Net.NetworkCredential();
    credentials.Domain = "YOUR_DOMAIN_NAME";
    credentials.UserName = "YOUR_USER_NAME";
    credentials.Password = "YOUR_USER_PASSWORD";

    QueryCriteria query = new QueryCriteria();
    query.CriteriaElement = new CriteriaElement[1];
    query.CriteriaElement[0] = new CriteriaElement();
    query.CriteriaElement[0].DataSourceName = "CustTable";
    query.CriteriaElement[0].FieldName = "AccountNum";
    query.CriteriaElement[0].Operator = Operator.Equal;
    query.CriteriaElement[0].Value1 = textBoxAccountNum.Text;

    CustomerService service = new CustomerService();
    service.Credentials = credentials;
    try
    {
        AxdCustomer customer = service.find(query);
        if (customer != null &&
            customer.CustTable != null &&
            customer.CustTable.Length > 0)
        {
            labelName.Text = customer.CustTable[0].Name;
        }
    }
    catch (Exception ex)
    {
        MessageBox.Show("Service failed",
                        "Error",
                        MessageBoxButtons.OK,
                        MessageBoxIcon.Hand,
                        MessageBoxDefaultButton.Button1);               
    }           
}
You application should look like that:
Windows Mobile 5 Emulator

Report in AX 2012 R3 Mobile Device Portal

This post shows how to provide an SSRS report via Mobile Device Portal in Dynamics Ax 2012 R3. The user will be able to scan an Item ID and the MDP page will show the BOMConsistOf Report for this item. Therefore the report will be rendered as HTML.
First, create a file share on the web server where Dynamics AX can save the HTML File. In my case I’ve created an additional folder in C:\Program Files (x86)\Microsoft Dynamics AX\60\Warehouse Mobile Devices Portal0\ , called it “Report” and set the folder properties in windows explorer to be a file share.
Report folder in Mobile Device Portal
In Dynamics AX Development Workspace, extend the base enums WHSWorkActivity and WHSWorkExecuteModeby adding an additional enumeration value called “ItemInformation”. I’m using the label @SYS113931 for “Item Information”.
Next, create a new class that extends WHSWorkExecuteDisplay
class ERPWHSWorkExecuteDisplayItemInfo extends WHSWorkExecuteDisplay
{
}
The MDP page will include 2 steps, first to scan an ItemId and second to create the report and provide a link. Therefore add 3 methods to the class
// Label and text field for an ItemID container buildStep0(container _con)
{
    xSession    session = new xSession();
    container   ret = _con;
    ret += [this.buildControl(#RFLabel,’Lbl_ItemId’,’Scan Item ID’,1,”,
            #WHSRFUndefinedDataType,”,0)];
    ret += [this.buildControl(#RFText,’ItemId’,"@SYS7407",1,”,
            extendedTypeNum(ItemId),”, 0)];
    ret += [this.buildControl(#RFButton,#RFOK,"@SYS5473",1,”,
            #WHSRFUndefinedDataType,”,1)];
    return ret;
}
// Disabled text field with ItemID and Label with URL to HTML report
container buildStep1(container _con)
{
    xSession    session = new xSession();
    container   ret = _con;
    ret += [this.buildControl(#RFText,’ItemId’,"@SYS7407",1,
            pass.lookup(‘Item’),extendedTypeNum(ItemId),”,0,false)];
    ret += [this.buildControl(#RFLabel,’A_REPORT’, 
            ‘
http://localhost:8080/Report/bom.html’,
            1,”,#WHSRFUndefinedDataType,”,0)]; 

    ret += [this.buildControl(#RFButton,#RFOK,"@SYS5473",1,”,
            #WHSRFUndefinedDataType,”,1)];
    return ret;
}
// Set ItemID range and save report to File
private void createReport()
{
    ItemId itemId = pass.lookup(‘Item’);
    Query query; 
    BOMConsistOfController ctrl = new BOMConsistOfController();
    ctrl.parmReportName(ssrsReportStr(BOMConsistOf,Report));
    query = ctrl.parmReportContract().parmQueryContracts().
            .lookup(‘BOMConsistOfDP_DynamicParameter’);
    SysQuery::findOrCreateRange(query.dataSourceNo(1),
              fieldNum(InventTable,ItemId)).value(itemId); 

    ctrl.parmReportContract().parmPrintSettings()
         .printMediumType(SRSPrintMediumType::File);
    ctrl.parmReportContract().parmPrintSettings()
         .fileFormat(SRSReportFileFormat::HTML4_0);
    ctrl.parmReportContract().parmPrintSettings()
         .parmFileName(@"\\localhost\Report\bom.html");
   
    ctrl.parmReportContract().parmPrintSettings().overwriteFile(true);
    ctrl.run();
}
Add this code the displayForm method
public container displayForm(container _con, str _buttonClicked = ”)
{
    WHSWorkExecute  workExecute = new WHSWorkExecute();
    container       ret = connull();
    container       con = _con;
    int             hasError = 0;
    int             startInfologLine;
    pass = WHSRFPassthrough::create(conPeek(_con, 2));
    hasError = this.hasError(_con);
    if (pass.exists(#UserId))
    {
        userId = pass.lookup(#UserId);
    }
    startInfologLine = infologLine() + 1; 
    switch (step)
    { 
        case 0:             ret = this.buildStep0(ret);
            step = 1;
            break;
        case 1:
            pass.insert(‘Item’, conPeek(conPeek(con, 4 + hasError), #data));
            this.createReport();
            ret = this.buildStep1(ret);
            step = 2;
            break;
        case 2:
            pass = this.resetPassthrough(ret, false);
            ret = this.buildStep0(ret);
            step = 0;
            break;
        default:
            break;
    }
    ret = this.updateModeStepPass(ret,WHSWorkExecuteMode::ERPItemInfo,
          step,pass);
    ret = this.addCancelButton(ret, 1, true);
    return ret;
}
With this code in place the Mobile Device Portal page will show a simple text with the Reports URL. However, to provide a link, some JavaScript code is require. Start Visual Studio (or any other HTML editor) as Admin and open C:\Program Files (x86)\Microsoft Dynamics AX\60\Warehouse Mobile Devices Portal0\Views\Execute\DisplayIEOS.aspx file. At the init() method add this code to hide the label and add a link.
function init() {
    "use strict";
    focusFirstEnabledInput();
    var label = document.getElementById("A_REPORTLbl");
    if(label != null)
    {
        label.style.display = ‘none’;
        var link = document.createElement(‘A’);
        link.setAttribute(‘HREF’,label.outerText);
        link.appendChild(document.createTextNode("Report"));
        label.parentNode.appendChild(link);
    }
}
Make sure to compile your work in X++ and IL and synchronize the Data Dictionary. Restarting the AOS might also be a good idea at this stage.
Finally, configure the new activity to be available in Mobile Device Portal menu. In Dynamics AX 2012 R3 > Warehouse Management > Setup > Mobile Device > Mobile Device Menu Item > Add a new item with Mode:Indirect and Activity Code:Item Information. In Warehouse Management > Setup > Mobile Device > Mobile Device Menu > select inventory and add the newly create menu item.
Open the Mobile Device Portal page, logon, select Inventory Management and Item Information. Provide a valid ItemId which has BOM lines. If you are using Contoso Demo data, item D0007 from company USMF is an example. Next, the SSRS report is create and placed as HTML file. The mobile device portal page will show the link to the HTML report.
SSRS Report as HTML in Mobile Device Portal
BTW: you may use Visual Studio Addins to debug the application

Monday 7 September 2015

Generate Periodic Invoices - Automatically

Generate Periodic Invoices - Automatically

Microsoft Dynamics AX 2012 has a feature that enables you to set up a customer to be billed on a recurring basis, essentially handling all of your periodic invoices for you.
Example: you have a customer who uses one of your warehouses, and he abides by a rent agreement of 30,000 Rs month for the next three years. To receive payment from your customer, you need to send a free text invoice every month for the rent amount.
With a free text invoice, you have a recurring process for sending your customer an invoice every month for the next three years. 
This feature involves a three step process for enrolling a customer for a recurring free text invoice:
A. Create a free text invoice template
B. Assign the template to a customer
C. Generate and post the recurring invoice

Create a free text invoice template

As a first step, you need to create a free text invoice template. One template can be used for multiple customers.
To create a free text invoice template, you first need to go to Accounts receivable > Setup > Free text invoice templates (please see Figure 1).
Navigation path for free text invoice templates.
Fig 1: Navigation path for free text invoice templates.
After getting to the free text invoice templates, click New, and then enter a template name and description.
In the Invoice Line section, enter a description, a main account, and a unit price.
You need to enter a description, main account, and unit price when completing the Invoice Line section of a free text invoice template.
Fig 2: You need to enter a description, main account, and unit price when completing the Invoice Line section of a free text invoice template.

Assign the template to a customer

This step allows you to select the customer you wish to receive the recurring invoices. With the invoice functionality in Microsoft Dynamics AX 2012, each customer can have multiple templates.
To assign a template to a customer, go to Accounts receivable > Common > Customers > All customers > Invoice tab > Recurring invoices button.
Assign a free text invoice template to a customer.
Fig 3: Assign a free text invoice template to a customer.
After you select a template for the customer, you then select a start date and end date of the invoice, as well as the recurrence you want to set the invoice communications (such as if you want the customer to receive their invoice weekly, monthly, etc.) After filling in the appropriate information, click Save and close the form.

Additional parameters are set up for a customer with recurring free text invoices – such as the start and end date of the invoice messages, the time frame that the recurrence should be set, etc.
Fig 4: Additional parameters are set up for a customer with recurring free text invoices – such as the start and end date of the invoice messages, the time frame that the recurrence should be set, etc.

Generate and post the recurring invoice

To generate the recurring free text invoice, go to Accounts Receivable > Periodic > Generate recurring Invoices.
Navigation path for generating recurring free text invoices.
Fig 5: Navigation path for generating recurring free text invoices.
On the opened form, enter the parameters needed to generate the recurring invoice – such as the Customer Account, the invoice date, template, and the invoice generation date. Once the parameters are completed, click OK to generate the invoice.
Parameter selection for generating recurring free text invoices for a customer.
Fig 6: Parameter selection for generating recurring free text invoices for a customer.
After clicking OK, the following Info log will pop up to show that the recurring invoice has been generated successfully (please see Figure 7).
Infolog showing the successful creation of a recurring free text invoice.
Fig 7: Info log showing the successful creation of a recurring free text invoice.
After the recurring free text invoice has been created and generated, the next step is to post the invoice. To post a recurring free text invoice, go to Accounts Receivable > Periodic > Post recurring Invoices.
Navigation path for posting recurring free text invoices.
Fig 8: Navigation path for posting recurring free text invoices.
After selection the “Post recurring invoices”, the following form will open to show the generated recurring invoice header.
Generated free text invoice header.
Fig 9: Generated free text invoice header.
On the opened form, click the lines to check the customer name, date, and amount.
A generated free text invoice line.
Fig 10: A generated free text invoice line.
After checking that all the information in the invoice is correct, click the Post button to post the invoice.
Once you click to post the invoice, the following Info log will pop up to show that the recurring invoice has been posted successfully (please see Figure 11).
Infolog showing the successful posting of a recurring free text invoice
Fig 11: Info log showing the successful posting of a recurring free text invoice
The posted free text invoice can then be viewed on Account Receivable > Common > Free Text Invoice > All Free Text Invoice.
 A posted free text invoice as shown in the Accounts Receivable common form
Fig 12: A posted free text invoice as shown in the Accounts Receivable common form

Advantages

There are several advantages of using the above process to take care of the recurring invoices you send out to customers:
  1. You can run the automatic invoice generation in a batch process. The batch will run as per the recurrence set by you to generate automatic invoice ready for posting.
  2. System validation will prevent you from generating a duplicate invoice. So for example, if you are running the invoice generation manually and tried to generate the same invoice more than once a month (if it’s a monthly recurring invoice), then the system will prevent this from occurring.
  3. The system will automatically validate pending invoice generation and create the previous invoice. For example, say you are running the invoice generation manually and have forgotten to run the invoice generation process for one month. When you try to run the invoice generation process in the subsequent month, the system will automatically validate the pending invoice generation and create the previous month’s invoice also.
  4. You can edit the invoice amount before posting the invoice.