Wednesday, 20 April 2016

How to Find Particular Value/Entry in Whole SQL Database

/*
Name: SearchForData.SQL V1.0
Purpose: This SQL script searches for data in a database. The search can be configured to use different data types, exact match and case sensitivity.
How to Use: Before running this script, first change the @DataToFind value to what is to be searched for. Other configuration settings can also be made
in the "DEFINE SEARCH" section.
*/

-- PLEASE DEFINE SEARCH CRITERIA BEFORE RUNNING THIS SCRIPT.

USE Symantec_CMDB -- Change "Symantec_CMDB" to the database name to use if it is different.
DECLARE @DataToFind NVARCHAR(MAX) = 'value to search for' -- Change the value of @DataToFind to be what is to be searched for.
DECLARE @DataType NVARCHAR(6) = 'Text' -- Change the value of @DataType to be Text (default), Number, Guid, Date or All.
DECLARE @ExactMatch BIT = 0 -- Change the value of @ExactMatch to be 0 or 1. 0 equals a wildcard match (default), 1 equals an exact match.
DECLARE @CaseSensitive BIT = 0 -- Change the value of @CaseSentitive to be 0 or 1. 0 equals not case sentitive (default), 1 equals case sensitive.
--
DECLARE @Schema TABLE (RowID INT IDENTITY(1,1), STableName NVARCHAR(MAX), SColumnName NVARCHAR(MAX), SDataType NVARCHAR(MAX), DataSize NVARCHAR(100))
DECLARE @Found TABLE(FTableName NVARCHAR(MAX) DEFAULT '', FColumnName NVARCHAR(MAX) DEFAULT '', FDataType NVARCHAR(MAX), Match NVARCHAR(MAX))
DECLARE @LoopNo INT, @TotalRows INT, @SQL NVARCHAR(MAX), @ParamDef NVARCHAR(MAX), @DataExists BIT, @TableFound NVARCHAR(MAX), @ColumnFound NVARCHAR(MAX),
@DataTypeFound NVARCHAR(MAX), @DataTypeSize NVARCHAR(MAX), @DataTypesToUse1 NVARCHAR(16), @DataTypesToUse2 NVARCHAR(16), @DataTypesToUse3 NVARCHAR(16),
@DataTypesToUse4 NVARCHAR(16), @DataTypesToUse5 NVARCHAR(16), @DataTypesToUse6 NVARCHAR(16), @DataTypesToUse7 NVARCHAR(16), @DataTypesToUse8 NVARCHAR(16),
@DataTypesToUse9 NVARCHAR(16), @DataTypesToUse10 NVARCHAR(16), @DataTypesToUse11 NVARCHAR(16), @DataTypesToUse12 NVARCHAR(16), @DataTypesToUse13 NVARCHAR(16),
@DataTypesToUse14 NVARCHAR(16), @DataTypesToUse15 NVARCHAR(16), @DataTypesToUse16 NVARCHAR(16), @DataTypesToUse17 NVARCHAR(16), @DataTypesToUse18 NVARCHAR(16),
@DataTypesToUse19 NVARCHAR(16), @DataTypesToUse20 NVARCHAR(16)
--Note: This script will only search the defined data types as specified by the @DataType variable. For example, if String is the data type, numeric
--data types such as INT will not be searched, however, if the number being searched for exists in an NVARCHAR, the match will be found.
IF @DataType = 'Text'
BEGIN
  SET @DataTypesToUse1 = 'NVARCHAR'
  SET @DataTypesToUse2 = 'VARCHAR'
  SET @DataTypesToUse3 = 'NTEXT'
  SET @DataTypesToUse4 = 'TEXT'
  SET @DataTypesToUse5 = 'NCHAR'
  SET @DataTypesToUse6 = 'CHAR'
  SET @DataTypesToUse7 = ''
  SET @DataTypesToUse8 = ''
  SET @DataTypesToUse9 = ''
  SET @DataTypesToUse10 = ''
END
IF @DataType = 'Guid'
BEGIN
  SET @DataTypesToUse1 = 'UNIQUEIDENTIFIER'
  SET @DataTypesToUse2 = 'NVARCHAR'
  SET @DataTypesToUse3 = ''
  SET @DataTypesToUse4 = ''
  SET @DataTypesToUse5 = ''
  SET @DataTypesToUse6 = ''
  SET @DataTypesToUse7 = ''
  SET @DataTypesToUse8 = ''
  SET @DataTypesToUse9 = ''
  SET @DataTypesToUse10 = ''
END
IF @DataType = 'Number'
BEGIN
  SET @DataTypesToUse1 = 'INT'
  SET @DataTypesToUse2 = 'BIGINT'
  SET @DataTypesToUse3 = 'SMALLINT'
  SET @DataTypesToUse4 = 'TINYINT'
  SET @DataTypesToUse5 = 'FLOAT'
  SET @DataTypesToUse6 = 'REAL'
  SET @DataTypesToUse7 = 'DECIMAL'
  SET @DataTypesToUse8 = 'MONEY'
  SET @DataTypesToUse9 = 'SMALLMONEY'
  SET @DataTypesToUse10 = 'BIT'
END
-- Note: DateTime values are stored as (example) 2011-12-06 07:45:09.257, however, appear as Dec 6 2011  7:45AM.
-- To search for "2011-12-06", specify "Dec  6 2011". Also  note that for single digit days, there is an extra space
-- after the month, as the above example shows.
IF @DataType = 'Date'
BEGIN
  SET @ExactMatch = 0
  SET @DataTypesToUse1 = 'DATETIME'
  SET @DataTypesToUse2 = 'SMALLDATETIME'
  SET @DataTypesToUse3 = 'NVARCHAR'
  SET @DataTypesToUse4 = ''
  SET @DataTypesToUse5 = ''
  SET @DataTypesToUse6 = ''
  SET @DataTypesToUse7 = ''
  SET @DataTypesToUse8 = ''
  SET @DataTypesToUse9 = ''
  SET @DataTypesToUse10 = ''
END
IF @DataType = 'All'
BEGIN
  SET @ExactMatch = 0
  SET @DataTypesToUse1 = 'NVARCHAR'
  SET @DataTypesToUse2 = 'VARCHAR'
  SET @DataTypesToUse3 = 'NTEXT'
  SET @DataTypesToUse4 = 'TEXT'
  SET @DataTypesToUse5 = 'NCHAR'
  SET @DataTypesToUse6 = 'CHAR'
  SET @DataTypesToUse7 = 'UNIQUEIDENTIFIER'
  SET @DataTypesToUse8 = 'INT'
  SET @DataTypesToUse9 = 'BIGINT'
  SET @DataTypesToUse10 = 'SMALLINT'
  SET @DataTypesToUse11 = 'TINYINT'
  SET @DataTypesToUse12 = 'FLOAT'
  SET @DataTypesToUse13 = 'REAL'
  SET @DataTypesToUse14 = 'DECIMAL'
  SET @DataTypesToUse15 = 'MONEY'
  SET @DataTypesToUse16 = 'SMALLMONEY'
  SET @DataTypesToUse17 = 'BIT'
  SET @DataTypesToUse19 = 'DATETIME'
  SET @DataTypesToUse20 = 'SMALLDATETIME'
END
INSERT INTO @Schema(STableName, SColumnName, SDataType, DataSize)
SELECT T.TABLE_NAME, C.COLUMN_NAME, C.DATA_TYPE, C.CHARACTER_MAXIMUM_LENGTH
FROM Information_Schema.Tables AS T
JOIN Information_Schema.Columns AS C
ON T.TABLE_NAME = C.TABLE_NAME
WHERE T.TABLE_TYPE = 'BASE TABLE'
AND (DATA_TYPE = @DataTypesToUse1 OR DATA_TYPE = @DataTypesToUse2 OR DATA_TYPE = @DataTypesToUse3 OR DATA_TYPE = @DataTypesToUse4
OR DATA_TYPE = @DataTypesToUse5 OR DATA_TYPE = @DataTypesToUse6 OR DATA_TYPE = @DataTypesToUse7  OR DATA_TYPE = @DataTypesToUse8
OR DATA_TYPE = @DataTypesToUse9 OR DATA_TYPE = @DataTypesToUse10 OR DATA_TYPE = @DataTypesToUse11 OR DATA_TYPE = @DataTypesToUse12
OR DATA_TYPE = @DataTypesToUse13 OR DATA_TYPE = @DataTypesToUse14 OR DATA_TYPE = @DataTypesToUse15 OR DATA_TYPE = @DataTypesToUse16
 OR DATA_TYPE = @DataTypesToUse17 OR DATA_TYPE = @DataTypesToUse18 OR DATA_TYPE = @DataTypesToUse19 OR DATA_TYPE = @DataTypesToUse20)
ORDER BY T.TABLE_NAME, C.COLUMN_NAME
SELECT @LoopNo = 1, @TotalRows = MAX(RowID)
FROM @Schema
WHILE @LoopNo <= @TotalRows
BEGIN
  IF @ExactMatch = 1
    SET @SQL = 'IF EXISTS(SELECT * FROM ReplaceTableName WHERE CONVERT(NVARCHAR(MAX), [ReplaceColumnName]) = ''' +
    @DataToFind + ''') SET @DataExists = 1 ELSE SET @DataExists = 0'
  ELSE
    SET @SQL = 'IF EXISTS(SELECT * FROM ReplaceTableName WHERE CONVERT(NVARCHAR(MAX), [ReplaceColumnName]) LIKE ''%' +
    @DataToFind + '%'') SET @DataExists = 1 ELSE SET @DataExists = 0'
  SET @ParamDef = '@DataExists Bit OUTPUT'
  SELECT @SQL = REPLACE(REPLACE(@SQL, 'ReplaceTableName', QUOTENAME(STableName)), 'ReplaceColumnName', SColumnName)
  FROM @Schema
  WHERE RowId = @LoopNo
  EXEC SP_EXECUTESQL @SQL, @ParamDef, @DataExists = @DataExists OUTPUT
  IF @DataExists = 1
  BEGIN
    SELECT @TableFound = STableName FROM @Schema WHERE RowID = @LoopNo
    SELECT @ColumnFound = SColumnName FROM @Schema WHERE RowID = @LoopNo
    SELECT @DataTypeFound = SDataType FROM @Schema WHERE RowID = @LoopNo
    SELECT @DataTypeSize = DataSize
    FROM @Schema
    WHERE RowID = @LoopNo
    IF @DataTypeSize <> ''
      SET @DataTypeFound = @DataTypeFound + '(' + @DataTypeSize + ')'
    SET @SQL = 'SELECT [' + @ColumnFound + '] FROM [' + @TableFound + '] WHERE CONVERT(NVARCHAR(MAX), [' + @ColumnFound + ']) '
    IF @CaseSensitive = 1
      SET @SQL = + @SQL + 'COLLATE Latin1_General_CS_AS '
    IF @ExactMatch = 0
      SET @SQL = @SQL + 'LIKE ''%' + @DataToFind + '%'''
    ELSE
      SET @SQL = @SQL + '= ''' + @DataToFind + ''''
    INSERT INTO @Found(Match)
    EXEC SP_EXECUTESQL @SQL
    UPDATE @Found
    SET FTableName = @TableFound, FColumnName = @ColumnFound, FDataType = @DataTypeFound
    WHERE FTableName = ''
  END
  SET @LoopNo = @LoopNo + 1
END
IF @ExactMatch = 0
  SELECT FTableName AS 'Table', FColumnName AS 'Column', FDataType AS 'Data Type', Match -- Note: If the Data Type is not desired to be seen, remove this here.
  FROM @Found
  ORDER BY FTableName, FColumnName, Match
ELSE
  SELECT FTableName AS 'Table', FColumnName AS 'Column', FDataType AS 'Data Type' -- Note: If the Data Type is not desired to be seen, remove this here.
  FROM @Found
  ORDER BY FTableName, FColumnName

AX 2012 Reporting services extensions and Analysis services configuration

AX 2012 - Reporting services extensions

Download the Microsoft Dynamics AX 2012 Feature pack from customer/partner source.


Click on the Validate system requirements


Select the option, which you want to install and verify all the pre requisites are installed properly.


After installation of pre requisite components, install the “Microsoft Dynamics AX Components”


Select the “Reporting services extensions” check box and proceed


Select the SQL Reporting services instance name.

If you want to deploy the reports after installation select the “deploy reports” option.


How to deploy SSRS reports Manually ?

Deploy reports using MS dynamics ax 2012 power shell:

Start -> All programs -> MS dynamics AX 2012 -> MS dynamics AX 2012 Management shell


 execute the below mentioned command


AX 2012 - Analysis services configuration


Install the analysis services on SQL server instance and install the “analysis services configuration” from the AX 2012 setup


Complete the prerequisites


Select the SQL Server analysis service instance service name


 Enter the business connecter proxy account username and password


Connect to AX 2012 Database to configure the Analysis services


Deploy the Analysis Services Project:


 Select the deploy option and "Next"


Monday, 11 April 2016

Failed To Create a Session Confirm That The User Has The Proper Privileges….!!!

Option 1: Partitions

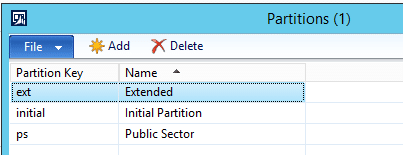
If someone has setup a new environment for you and imported the demo data using the “Test Data Transfer Tool” you can run into this error upon sync.  The reason you get this error is that there are 3 partitions:   Ext, Initial and PS and userInfo was only given to the initial partition.  What you need to do to resolve this issue is:
a. First in SQL review the userinfo table and checkout how many times you see the Admin ID in the table:  select * from userinfo where id = ‘admin’
b. I’m guessing you only see the admin record one time and this would be the problem.  When you have multiple partitions you should see the record in there for as many partitions as you have.  So, in our instance there should be 3 admin records in the userinfo table.
c. In SQL I usually run this command:  delete PARTITIONS where PARTITIONKEY in (‘ext’‘ps’)
d. Next open the AX client and navigate to:  System Administration > Setup > Partitions.
e. You should only see one partition called “Initial”.  We need to recreate the two we delete via our SQL script.  So create two new partitions called:  Ext and PS as seen below.
tomb_partition
f. Go review the userinfo table in SQL you should see that two new records have been automatically added for the administrator account.
g. Now try to sync the database in AX and you should have success!

Option 2: Run Business Logic

The second thing you can try which occasionally works is to run the business logic not using IL.  You can disable this by:
a. In the AX client navigate to:  File > Tools > Options > Development hyperlink.
b. Unmark “Execute Business Operations in CIL”.
c.  Close the AX app and restart your AOS.
d. Open AX and try to Sync.

image

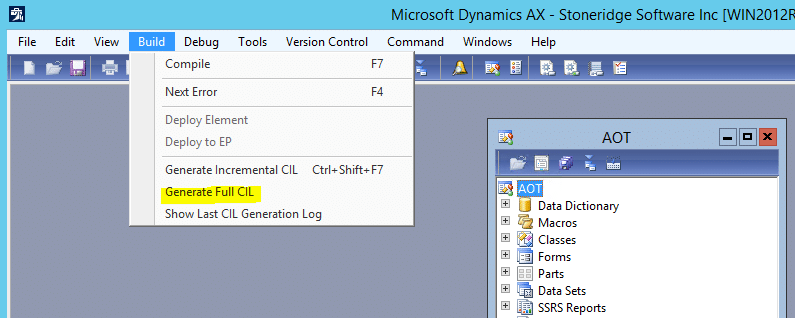
Option 3. Run a Full CIL.

a. To do this restart your AOS 1st and then from the AX Development Environment go to:
i. Build > Generate Full CIL.
tomb_generatecil
b. Now try to Sync.

Option 4: Delete your AUC Files.

NOTE:  The AUC file is a cache of objects from the AOT.
a. Close out of AX.
b. Navigate to one of the following:
i. Windows XP and Windows 2003
C:\Documents and Settings\%username%\Local Settings\Application Data
ii. Windows Vista, Windows 7 and Windows 2008
C:\Users\%username%\AppData\Local
c. Delete the file or files with the extension .auc.
d. Open AX and try to Sync.

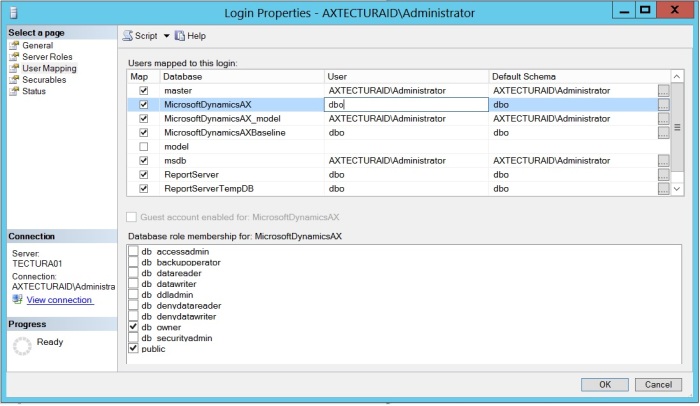
Option 5: Improper Privileges

The user actually doesn’t have the proper privileges in SQL to run a sync which means they aren’t in the db.reader and db.datawrite roles.  You can review this blog to check your SQL User Mapping.
Untitled

Sunday, 28 February 2016

Retail POS permissions and operation


To get started, lets first define each of the 3 entities:
  1. Operations – These are the tasks that employees perform at the POS, assigned with a Permission
    1. Retail >> Setup >> POS >> Operations
  2. Permissions – These are the ID’s associated to the fields on the Permission group form.
    1. Retail >> Setup >> POS >> Operations >> Right click on the Permission ID field, click View details
  3. Permission groups – A set of enabled/disabled Permissions that can be assigned to each Worker
    1. Retail >> Setup >> POS >> Permission groups
HOW DO THEY RELATE
On the Permission group form, there is an option for “Allow create order”.  When marked the cashier with this permission group can create customer orders at POS that also creates orders directly in AX. If we open the Operations form, you will see that Operation ID 620 is for Create customer order and this has a Permission ID listed is 1020.  Right click on 1020 and select View Details.  This will open the Permissions form and you will see that 1020 relates to allowCreateOrder.  If you look at the Operations list again, you will see that Operation 621-Create quotation also has Permission ID 1020 listed.  What this means is when you place a checkmark next to the field “Allow create order” on the Permission group form, you also gain access to “Create quotation”. 
On the Operations form you will notice that many of the Operations are listed with Permission ID’s of 0.  This means that everyone has access to perform those functions.  If you would like to limit these operations you can choose a Permission ID from the dropdown to associate it to a field on the Permission group form such as Manager Privileges. 
The Permission ID and Permission ID2 fields allow you to assign two different Permissions to the operation.  For example, we can set the 500-Void transaction Operation with a permission of 1001-allowTransactionVoiding as well as the 1002-managerPrivileges.  This means 3 things:
  1. If a Cashier Permission group does not Manager privileges or Allow transaction voiding marked, then the cashier will be prompted for a manager override to perform this function.
  2. If a Supervisor Permission group does not Manager privileges marked but does have Allow transaction voiding marked, then the Supervisor is able to perform the Void without a Manager.
  3. If a Manager Permission group has the Manager privileges marked then the Manager is able to perform the Void regardless of the Allow transaction voiding field.
The Operations form also has a Check user access field.  This determines if Retail POS should check a user’s privileges before the operation is performed. If this is not checked and you had Manager privileges set to an Operation, this will just skip the user validation and allow any user to perform the function.
MANAGER OVERRIDE PRIVILEGES
The Manager privileges option can be confusing as one may assume that this means they would have access to all operations.  This is untrue.  Selecting Manger privileges on the Permission group form gives the user access to any Operation that has the 1002-manager Privileges Permission assigned to it. Normally a manager would have most of the options marked on the Permission group form, thus giving them access to practically all functionality at the POS.  Adding Manager privileges to any of the Operations will prompt a cashier who doesn’t have direct permissions for Manager login approval before continuing. 
OPERATIONS NOT LISTED ON THE PERMISSION GROUP FORM
You may have noticed that there are about 24 Permissions, but there are about 128 Operations.  Many of these are left with Permission ID’s of 0, meaning they are open for everyone to use.  Keep in mind, as a cashier, I probably wouldn’t have access to edit the POS buttons available to me and thus would not have access to all of these Operations such as “Minimize POS” unless someone made that available. 
If you wanted to link additional Operations to the Permission group form, the out of the box solution would be to assign the Permissions in the Operations form to link it to an existing Permission Group field option.  Let’s take the 1017-allowReturn permission and 114 Return transaction Operation.  These are not available on the Permission group form.  If you would like to toggle the access to this Operation, you could link this with another field such as “Allow transaction voiding”.  So for Operation 114-Return transaction, assign Permission ID 1001.  Now if a cashier’s Permission group has the “Allow transaction voiding” marked, they can also process Return transactions.
WORKER PERMISSIONSThe POS permission group is assigned to a worker at the Job level.  To view this through Retail, go to: Retail >> Common >> Workers >> select a worker >> in the right pane, expand Position assignment and click on the hyperlink for the Job >> expand the Job classification fast tab >> view the POS permission group

Install Printer On Retail POS

HOW TO CONFIGURE RETAIL DEVICES WITH AX AND EPSON OPOS DRIVER
In this blog we will show you how to configure retail devices with AX 2012 and EPSON OPOS driver. For that at first we need to install the driver and configure the retail peripherals and at second we need to configure the AX.
A)     OPOS INSTALLATION
1)      Download the file ADK270ER15.exe on the following link https://download.epson-biz.com/modules/pos/index.php?page=single_soft&cid=3835

1
2)      Double click on the file and click on Execute
2

3)      The following widow will be deployed, then choose a folder and click on unzip:
 3
4)      Go to the folder selected on step 3), search for the file setup.exe and double click on it.
 4
5)      The following window will be deployed:
5
6)      When the loading process on the figure above finishes is finished the following window will be deployed, click on Next.
 6
7)      Then the following window is deployed, click on Next.
 7
8)      The following window will be deployed, click on the radio button highlighted on green and then click on Next.
 8
9)      The following window is deployed, choose the radio button highlighted on green and click on Next.
9
10)   The following window is deployed, choose the radio button highlighted on green and click on Next.
10
11)   The following window is deployed, click on Next.
 11
12)   Choose the ports for the communication with the EPSON device, for this example we choose the options in the following figure:
 12
13)   The following window is deployed, wait till the process end.
13
14)   The following window is deployed when the process end, click on Finish:
 14
15)   The release notes are deployed in a .txt file, close it.
 15
16)   The following window is deployed, click on the plus sign:
 16
17)   Then we can see that the driver is installed for the Retail devices.
 16
B)      RETAIL DEVICE INSTALLATION
In the next steps we will show you with an example how to install POSPrinter, the process is similar for the other retail devices like LineDisplay, CashDrawer, ElectronicJournal, MICR and CheckScanner.
17
1)      Right click on POSPrinter and choose Add New Device:
 18
2)      The following window is deployed, select the EPSON Retail device name (device name is different that the model), click on the arrow:
19
Choose the device name:
 20
3)      Select detailed model and click on Next
 21
4)      The following window will be deployed , click on Make Port
22
5)      The following window will be deployed, then choose the desired parameters (Choose “P” for parallel or “U” for USB, serial devices, which connect to COM ports, typically do not have a suffix) and click on OK
23
6)      Engage the port to the device and click on CheckHealth Interactive
 24
You will receive a test receipt printed if the drivers are configured correctly.
C)      AX CONFIGURATION
1) Go to Retail -> POS -> Profiles -> Hardware profiles
 25
2) The following window is deployed, then click on Printer and choose OPOS:
 26
3) At the same window Device name is the same that the POSPrinter on EPSON OPOS Driver:
27
4) Description is a free text field and Receipt profile ID is almost always Default
 28
5) Right click on OPOS and select View details
 29
6) The following window is deployed, right click on Receipt format column in the Receipt row and then click on View Details
30
7)      The following window is deployed, then click on Prompt question if you want a question window to print the receipt
 31
8)      Choose always print in Print behavior
 32