Wednesday, 23 November 2022

BOM Consumption Flushing Principal

A consistent setup for bill of materials (BOM) consumption is important because it helps guarantee that inventory management is efficient. For example, if BOM consumption parameters aren't set up correctly in Manufacturing execution, materials might be deducted from inventory twice or not at all.

On the Production order defaults page, automatic BOM consumption is set up in three stages:

  1. At the start of a production. Set up this stage on the Start tab.

    Screenshot of the finance and operations BOM consumption Start tab..

  2. During the production process, when an operation is completed. Set up this stage on the Operations tab.

    Screenshot of the finance and operations BOM consumption Operations tab..

  3. When a production order is reported as finished. Set up this stage on the Report as finished tab.

    Screenshot of the finance and operations BOM consumption Report as finished tab..

Go to Production control > Setup > Manufacturing execution > Production order defaults and select the Report as finished tab. For each stage, the Automatic BOM consumption field lets you select one of three methods for picking items for a production order:

  • Flushing principle - This option is used in combination with an option that is defined for the BOM in the Production module. If Flushing principle is selected in the Automatic BOM consumption field on the Start tab, all materials that are set to Start in the BOM are deducted from inventory when the operation is started. 

  • The Available at location option is used for products that are enabled for advanced warehouse processes. If you select this flushing principle, material is flushed when warehouse work for raw material picking is completed. Material is also flushed when a BOM line that uses this flushing principle is released to warehouse and the material is available at the production input location.

  •  If the Flushing principle field is set on the Start tab, you must select the same principle on either the Operations tab or the Report as finished tab. This requirement helps guarantee that materials are deducted from inventory on BOMs that use the Finish as a flushing principle on the production order. If the same flushing principle isn't selected on either the Operations tab or the Report as finished tab, materials might be deducted from inventory twice.

  • Always - If you select this option for a stage, materials are always deducted from inventory at that stage. For example, materials for the production are deducted when the production order is started. This setting requires that Never is selected on the Operations and Report as finished tabs. This requirement helps prevent items from being deducted from inventory twice.

  • Never - If you select this option for a stage, no BOM consumption occurs at that stage. For example, if you select Never on all three tabs (StartOperations, and Report as finished), materials must be manually deducted from inventory.

Thursday, 17 November 2022

D365FO Sales Agreements

 About Sales Agreement

A sales agreement is a contract that commits the customer to buy products in a specific quantity or for a specific amount over time, in exchange for special prices, special discounts, and other special terms, such as payment and delivery terms. The prices and discounts of the sales agreement override the prices and discounts that are stated in any trade agreements that exist.

Sales agreements is that they represent an agreement for specific pricing of an item, a category of items, or all items based on a commitment between a company and an individual customer or vendor.

D365FO, sales  agreements form in the Sales and Marketing  modules.


Set up sales agreement header

  • In the navigation pane, go to Modules > Sales and marketing > Sales agreements > Sales agreements.
  • Select New.
  • In the Customer account field, select the desired record from the drop-down menu.
  • In the Sales agreement classification field, select the desired record from the drop-down menu.
  • Expand the General section.
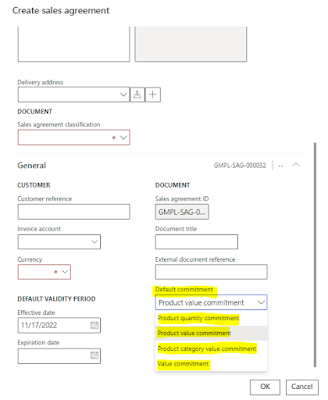
  • In the Default commitment field, select Product value commitment. A commitment type is a mandatory criterion that you must assign to the agreement to define how the agreement contract will be fulfilled. The four predefined types let you set up the customer's commitment target, expressed as a quantity or a value. The quantity commitment type can only be applied to a specific product, but the value-based types are applicable to sales of both specific and non-specific products.
  • In the Expiration date field, set the date to a future date when you want the agreement to expire.
  • Select OK.

Set up product value commitment lines

  • Select Add line.
  • In the Item number field, select the desired record from the drop-down menu. The type of commitment that you have chosen for the agreement affects the kind of information you can enter for the agreement lines. For example, for a value-based agreement you must specify the total net amount (in the agreed currency) for which the customer commits to buys goods from you. In this example the Quantity and Unit fields on the line are unavailable because you're creating an agreement for the customer to buy a specific value of a product.
  • In the Net amount field, enter the monetary amount that the customer has committed to buying.
  • In the Discount percent field, enter a percentage value that will apply to the customer's sales order lines that are linked to this agreement.
  • Expand the Line details section.
  • Select Yes in the Max is enforced field.
  • Selecting Max is enforced means that the total amount of all the sales order lines that use the commitment's special prices, discounts and/or payment terms must not exceed the amount specified on the commitment.
  • The minimum and maximum release amounts specify a range of values that must be sold on each sales order that uses the selected agreement.
  • Expand the Sales agreement header section. Unless the status of the agreement is set to Effective, sales orders cannot be associated with the agreement and can therefore not contribute to the fulfilment of that agreement. You can change the status manually at this stage. However, the status would normally be changed when you confirm the agreement for the customer.
  • On the Action Pane, select Sales agreement.
  • Select Confirmation. Make sure that the Mark agreement as effective option is set to Yes.
  • Select Yes in the Print report field.
  • Select OK.
  • Close the page. The agreement is now effective. You can start linking the customer's orders to the agreement to offset against the committed target.


Create Sales Agreement

Select a customer for the agreement and classify the agreement in the Sales agreement classification field. This field is used to group agreements together.


Open the General fast tab, a number of new fields become available.

In the Customer reference field you can enter the customer’s agreement reference number, if applicable.

The system automatically fills in the Currency field with the default currency associated with the selected customer. However, this can be overridden for the specific agreement.

In the Default validity period you can enter the period in which the contract is active.

You can enter a title for the agreement in the Document title field and a reference to an external document (the contract) in the External document reference field.


In the Default commitment field, you select what the agreement is for. You have the following options:

Product quantity = The agreement is for a specific quantity of a specific product.

Product value = The agreement is for a financial value of a specific product.

Product category value = The agreement is for a financial value of products within a specific category.

Value = The agreement is for a financial value across all products.

In my example, I create an agreement with a commitment for a specific quantity of a specific product (Product quantity commitment).

If the agreement relates to a specific project, you can select the project in the Project ID field.


Create Sales Order by Sales Agreement

Create a sales order directly from a sales agreement by using the Release order action. Alternatively, you can select an effective sales agreement when you're taking orders.


Create Sales Order by Sales Order

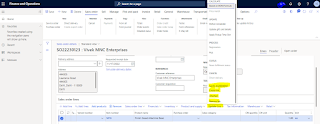
Creating a new sales order and select a sales agreement, the terms of that agreement, such as the payment terms, delivery terms, and delivery address, are applied to the order header, and the link between the agreement and the order is created. Then, on the order lines, when you can select products and categories that are specified in the sales agreement, the prices and discounts are copied from that agreement. The same sales order can include both lines that aren't related to a sales agreement and lines that have a commitment for a sales agreement.


Monday, 3 October 2022

How to reopen a closed period AX2012

If you did not have run the Fiscal year close process then you can write the Job to update the status of period to open. We can update the fiscal Period Status via Job

static void LedgerPeriodStatusUpdate(Args _args)

{

    LedgerFiscalCalendarPeriod  period;

    ttsBegin;

    select forupdate period

    where period.FiscalCalendarPeriod==5637155104;// (RecID of the Period Status which you want to modify)

    if(period)

    {

        period.Status=FiscalPeriodStatus::Open;

        period.update();

        info("Done");

    }

    ttsCommit;

}

Wednesday, 7 September 2022

Field ECC Number Must be Filled In #Error

 #Error Field ECC Number Must be Filled In

When I start the Production, I am encountering the below Error ECC number must be filled in.


How to fix the error 

Just you need to turn off the Excise button from General ledger parameters.


Friday, 19 August 2022

Gate Management -Challan in D365 FO

Gate Management

Overview

A gate entry for goods that are entering (Inward) and exiting (Outward) an organization, create the Gate Entry record details about goods that are entering /Outward an organization.

A gate entry record involves the following tasks

  1. Record a material receipt
  2. Measure quantities of material received
  3. Weigh the empty vehicle after unloading the material
  4. Record the exit of the vehicle
  5. Prepare a receipt document for the gate entry

We can assign gate entry for following documents transactions as below and there is no inventory impact till the particular document transaction complete.

  • Purchase order,
  • Sales order,
  • Transfer order
  • Return order.

Setup

By Click Inventory management > Setup > Inventory breakdown > Site.


On the Sites form, on the Number sequence Fast Tab, specify the number sequence for Gate inward and Gate outward.


Can create site wise number sequences.

Create gates for a site and then indicate whether the gate is an entry gate or an exit gate. 

Many gates can be created for a site and multiple gates can be defined as entry gates or exit gates.

To create entry and exit gates for a site, follow these steps

Click Inventory management > Setup > Inventory breakdown > Inventory site gate.

Click New.


Specify whether the gate is an entry gate or an exit gate in the Gate type field.

Select the site location for the gate in the Site field.

Enter the gate ID in the Gate field.

Close the form.


To create a gate entry record, follow these steps:


Click Inventory management > Periodic > Gate management > All inward gate entries.

Click New > Inward gate entry.


On the Inward gate entry header FastTab, select the factory gate and the warehouse.

Select the reference document type and reference party that is based on the reference document type.

Enter the transport details such as the lorry receipt, railway receipt number, or an air waybill number (LR/RR/AWB), the vehicle number, and the transporter name.

Select the LR/RR/AWB date and the challan date. 

Enter challan number, the origin from which the goods are transported, the driver’s name, and a description of the goods being sent to the organization. 

On the Inward gate entry lines FastTab, specify the details about the goods, quantity of goods ordered, and received quantity of items in the challan. 

Click Confirm vehicle entry The Status field is updated, and the vehicle entry time and date are recorded. 

Optional: On the Action pane, click Print > Show gate entry to print the gate entry slip. The gate entry details are updated in the related reference documents, such as the posted purchase product receipt, posted sales return order packing slip, or the posted transfer order.

On the Line details FastTab, on the Measurement tab, enter the manufacturer assigned number for the goods, the instrument that is used to measure the goods, the quantity of received goods, and the unit of measurement.

Click Confirm measurement.

On the Line details FastTab, on the Tare check tab, enter the tare weight of the goods and the unit of measurement.

Click Confirm tare check and then click Confirm vehicle exit. The vehicle exit date and time are saved. The reference documents such as the product receipt, sales return order packing slip, and transfer receipt are updated with the gate entry and measurement details.


Reference Document Type for Inward Gate Entry

  • OthersThe reference party is not applicable when the Reference document type field is set as Others.
  • Purchase OrderThe reference party are applicable when the Reference document type field is set as Purchase Order.
  • Sales Return OrderThe reference party are applicable when the Reference document type field is set as Sales Return Order.
  • Stock Transfer-InThe reference party are applicable when the Reference document type field is set as Stock Transfer-In.
  • Sub -contract returnThe reference party are applicable when the Reference document type field is set as Sub -contract return
  • RGP Return (Returnable Gate Pass) -The reference party are applicable when the Reference document type field is set as RGP Return.
    • A returnable gate pass is issued for materials that exit the premises and is returned (or materials that enter your facility and has to be sent back).
    • A non-returnable gate pass is issued for materials that enter the gates of your facility and do not exit (or exits your premises and is not to be returned).

Note

The Confirm measurement and Confirm tare check buttons are disabled when the Reference document type field is set to Others, or the Skip measurement check box is selected.


Example of "Purchase Order" Reference Document Type


Create Purchase Order and Select Gate Entry


Example of "Other" Reference Document Type


Friday, 5 August 2022

Requested Date and Requirement Date Calculation on Planned Orders and Pegging Form in Dynamics 365 Finance and Operations

Planned Order forms:

Requirement Date: 

This is the date when the customer needs the order to be shipped. In the case of Production, this is the date by which the item should be made. In the case of Forecast it will be the date of the forecast. If the original date that the customer requested cannot be met, then this date becomes the actual date that the request can be met.

Requested Date:  

If the requirement date cannot be met, then the system will show the original date as the requested date and the requirement date will show the date when the requirement can be met.

Scenario 1: We will use Sales orders to drive the planned orders.
In the example below the sales order has a ‘Requested Ship Date’ of 09/11/2020


  • If we run the Master planning, we should see the requirement date as 9/11/2020 on the planned order


  • On the pegging tab, the ‘Requirement date’ is as 9/11/2020


  • In this case there is no ‘Requested date’ on the pegging tab.

Scenario 2: Lets change the Requested ship date on the Sales order to 8/27/2020, so that the order cannot be delivered to the customer in time.


  • In this example the system cannot meet the requested date and so we will get futures and action messages.
    We see the requested date in this case is 8/27/2020, which was our requested ship date.


  • But when we look at the requirement date, it shows a date of 9/8/2020. That is the date we can make this item and ship it to the customer.


  • The requirement date on the Pegging remains at 8/27/2020.


  • In this example the ‘Add calculated delays to requirement’ date was checked


Scenario 3: Lets uncheck the ‘Add calculate delays to requirement date’ and run the master plan again.


  • The requested date on the planned order is still 8/27/2020


  • The Requirement date on the Planned order is 9/1/2020


  • The system ignores the delays in procurement of the raw material and considers that the order can be started on the next working day.


  • The Beta carotene is delayed but the system does not account for the delay as the ‘Add calculate delays to requirement date’ is not checked.

Scenario 4: Requested date on the Pegging

The Sales order is set with a Requested ship date of 9/15/2020


  • Set the Issue Margin on the coverage group or the Master plan to 2 days


  • Run the master planning again
    The requirement date and the requested date on the planned order are set to 9/9/2020 (9/11/2020-2 days)


  • On the Pegging the Requirement date =09/09/2020 and the Requested date =09/11/2020. So the requested date represents the shipment date whereas the requirement date takes the margin into account.


Scenario 5: The Sales order Requested Ship date is set to 09/05/2020 which is a Saturday

Run the master planning again


The Requested date is 09/4/2020 and the Requirement date =09/08/2020 on the Planned order


  • The pegging shows the requested date of 09/5/2020 and the requirement date of 09/04/2020.

Scenario 6: Set the Receipt Margin added to requirement date as 1


  • The pegging on the planned order shows the Requested day of 09/05/2020 and requirement date is 09/04/2020

The Requested date for the planned order moves to 09/03/2020 as there is a receipt margin of 1 day


The table below shows the summary of the various cases that have been discussed in this blog