Commission
Setup
The five essential setups for commission. These setups will work together to determine
what items, and customers are included in the calculation, how to divide
commission if they need to be shared across a sales group, how the commission
should be posted and much more.
Commission
On Customer Groups
The first setup is the
commission customer group. The commission customer group can be used identify
customers who should be included to the commission calculation. You will see
later in the “Commission Calculation” section that you can choose to include
all customers, a group of customers, or a single customer that should be
included in the commission calculation. Grouping customers together using the
commission customer group is the most common way to set up commissions.
·
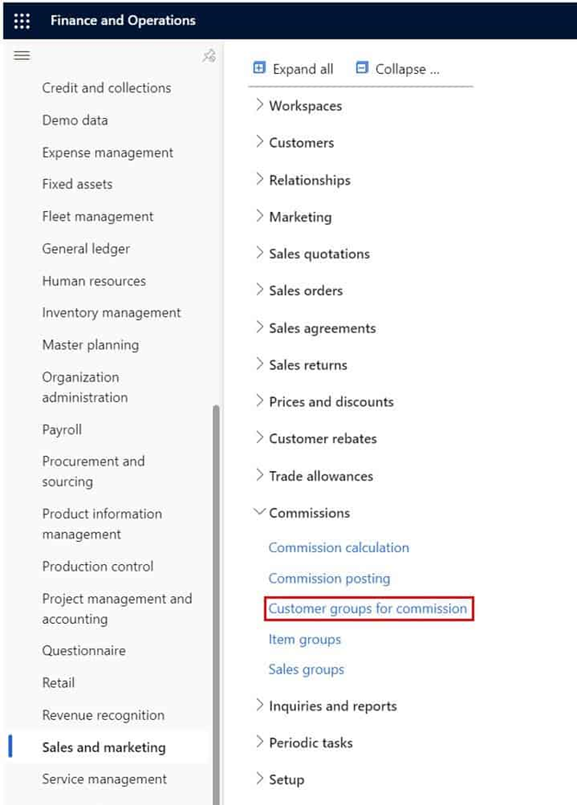
To create a
commission customer group, navigate to Sales and marketing > Commissions
> Customer groups for commissions.
·
Click the
“New” button.
·
Give the group
an ID and a name and click the “Save” button.
The next step is to assign
the commission customer group to the customers where we want to calculate
commission.
·
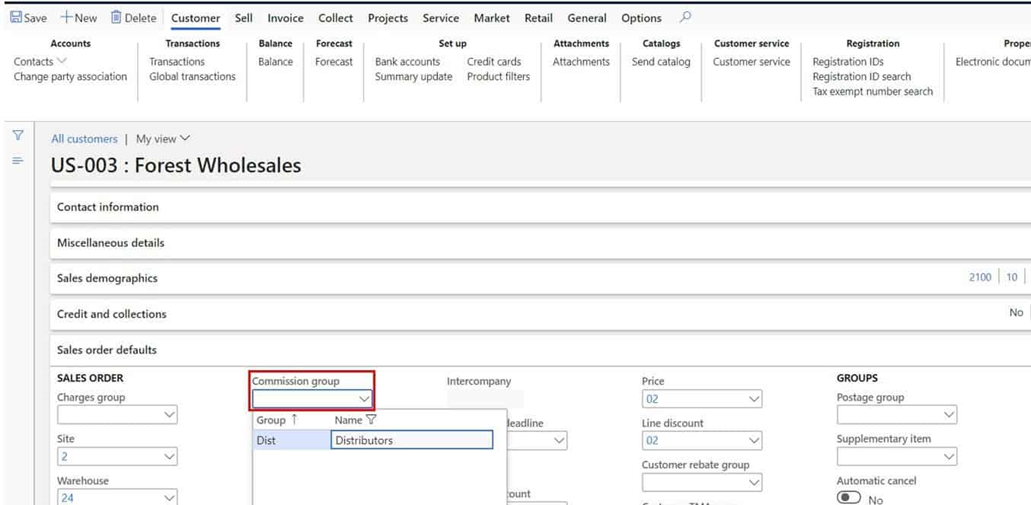
Navigate to
Sales and marketing > Customers > All customers.
In this example I will
assign it to one customer but in reality, you would assign it to all customers
you wanted to include in the commission calculation.
·
Click the
customer ID hyperlink to open the customer master record.
·
In the “Sales
order defaults” fast tab in the “Commission group” field select the commission
customer group you created above.
Commission
On Item Groups
Commission item groups are
how you can identify the items that are eligible for commissions.
·
To create a
commission item group, navigate to Sales and marketing > Commissions >
Item groups.
Click the “New” button and
give the group and ID and a name.
The next step is to assign
this commission item group to all the items that are eligible for this
commission calculation.
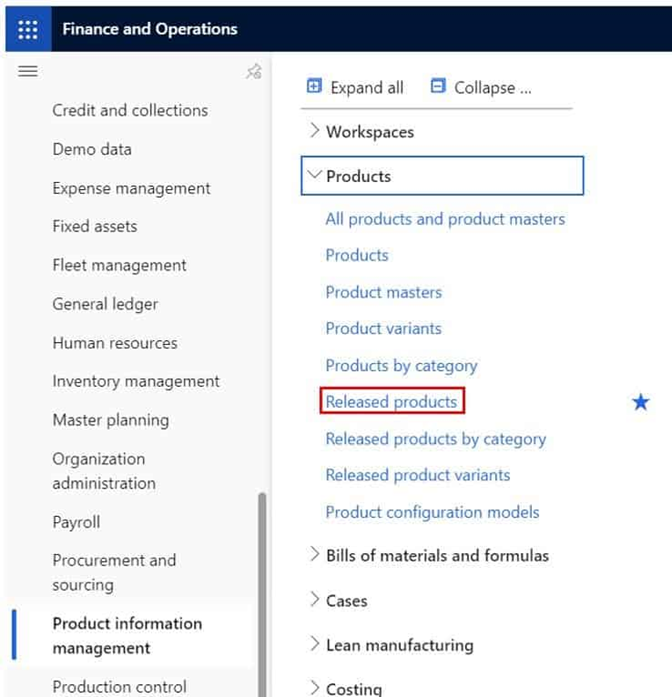
·
Navigate to
Product information management > Products > Released products.
Click the item ID
hyperlink to open the item master.
In the “Sell” fast tab in
the “Commission group” field select the commission item group we created above.
Sales
Groups
The sales groups are used
to identify groups of sales representatives. This is usually by sales territory
but there could be cases where sales representatives in different groups
overlap. The sales group is used in the commission calculation to determine
which group of sales representatives the commission should go to.
·
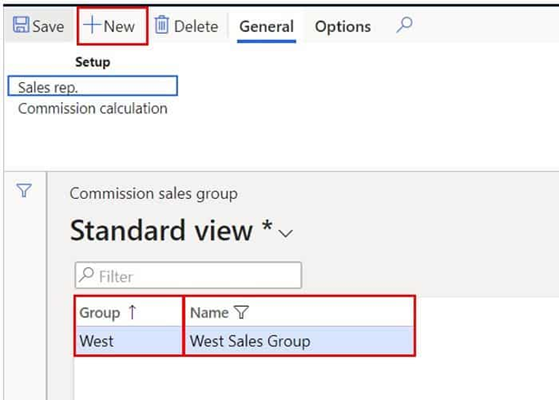
To create
commission sales group, navigate to Sales and marketing > Commissions >
Sales groups.
·
Click the
“New” button to create a new group.
·
Give the group
an ID and a name and click save.
In the “General” tab in
the ribbon click the “Sales rep.” button.
In this form we need to
identify the sales representatives that are part of this sales group.
·
Click the
“New” button to add a sales representative to the sales group.
·
In the “Name”
field select the representative.
In the commission field
identify how the commission should be split. In this example I have two sales
representatives and the senior representative will be receiving 60 percent of
the commission while the junior representative will be receiving 40 percent of
the commission.
The last step is to assign
this sales group to all the customers that this sales group is responsible for
and will receive commissions for selling to.
·
Navigate to
Sales and marketing > customers > All customers.
In the “Sales order
defaults” fast tab of the customer master there is a field called “Sales
group”. Select the sales group we created above.
Commission
Calculation
In the commission
calculation we put all the pieces together and define how the commission should
be calculated.
·
To create a
commission calculation, navigate to Sales and marketing > Commissions >
Commission calculation.
·
Click the
“New” button.
·
In the “Item
code” field we can define if the commission should be calculated for a single
item (Table), a group of items (Group), or for all items (All). In this example
we want it to calculate only for items assigned to the commission item group
that we created in the section above.
In the “Customer code”
field we can define if the commission should be calculated for a single
customer (Table), a group of customers (Group), or for all customers (All). In
this example we want it to calculate only for customers assigned to the sales
group that we created in the section above.
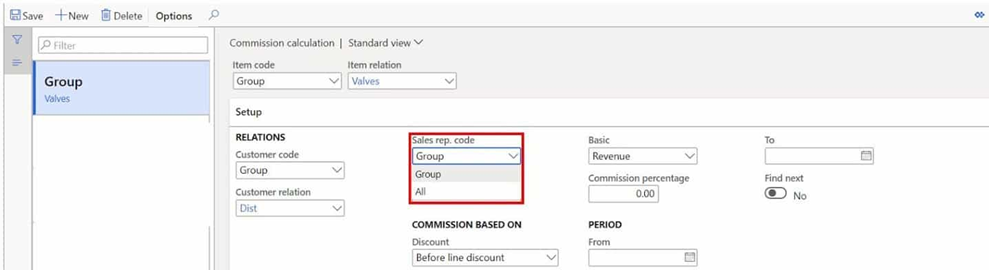
In the “Sales rep. code”
field we can define if the calculation should be calculated for a group of
sales representatives (Group), or all representatives (All). In this example we
want it to calculate only for the sales group we created above.
·
In the
“Discount” field we can define if we want the commission to be calculated
“Before a line discount”, “After a line discount”, or “After total discount”.
In this case I want the commission based on the amount before any discount is
applied.
·
The “Basic”
field determines if the commission calculation should be based on pure revenue
or only on the sale margin (difference between cost and sales price).
·
The
“Commission percentage” takes whatever you defined in the “Discount” and
“Basic” fields multiplies it by the percentage you define here to get your
commission.
·
The “From” and
“To” fields let you define a validity period. So, if you revise your commission
structure yearly you can set a validity period and set up a new commission for
next year’s commission structure whenever you know it.
·
The “Find
next” flag if enables tells the system to keep looking for another applicable
commission after this one. The system looks for the most granular level
commission it an find and then if the “Find next” flag is set to “No” it stops
looking if it is set to “Yes” and there is another commission that is
applicable it will include that commission as well.
Commission
Posting
Now that the commission
calculation is set up, we need to tell Dynamics 365 where to post the
commission.
·
Navigate to
Sales and marketing > Commissions > Commission posting.
·
In the
commission posting form you are able to use combinations of items, item groups,
sales categories and customers, customer groups, and all customers to define
main accounts that the commission should post to.
·
The commission
tab will be the debit and the commission offset tab will be the credit.
Process
Commissions
Commissions are calculated
upon sales order invoice so we will go through and process a sales order all
the way through invoicing and then look at the resulting calculation and ledger
postings for commissions.
·
Navigate to
Sales and marketing > Sales orders > All sales orders.
·
We will create
a new sales order by clicking the “New” button and select same customer that we
assigned our commission customer group and sales group to.
·
Click “Ok” to
create the sales order.
In the sales order line, I
will select the item that we assigned the commission item group to. Notice that
the net amount is $150,000.
·
Next I will
fast forward through the shipping process and go ahead and invoice the sales
order.
·
After we have
posted the invoice, we can view the commission calculation by clicking the
“Invoice” button in the “Invoice” tab in the ribbon.
Click the “Commission
transactions” button.
Here we can see that Aren received $3,000 and Alisa received $4,500. The calculation was 150,000 *
5% = $7,500. Then there was a 60/40 split between Aren and Alisa where Alisa
received 60% and Aren received 40%. So, 7,500 * 60% = $4,500 and the remaining
$3,000 goes to Aren.
Now we can also view the
commission posting by going back to the invoice journal and clicking on the
“Voucher” button.
As you can see, we have a
debit of 7,500 to 602150 and a credit to 201110.
How To
Get Commissions Reports
Now that we have our
commissions set up and working correctly, we can track the sales commissions
using a standard Dynamics 365 SSRS report called “Commission transaction list
report”.
·
Navigate to
Accounts receivable > Inquiries and reports > Commission transaction list
report.
·
Click “Ok” to
run the report.
·
As you can
see, we have all our commissions calculations broken out by sales
representative and the total at the end of the report.